Showing posts with label Food - Sauces. Show all posts

February 20, 2011

BBQ Chicken Sandwiches and Kempton Update

Kempton had his second surgery last Wednesday.

I picked him up from the vet on Friday at noon.

Much like his 1st surgery, he was really whiny and obviously in pain.

This time seems to be worse than the first time though.

The whining has lasted a lot longer (or at least it seems that way), his incision looks scarier, has more bruising around it, and seems more swollen.

The surgeon said that we need to take things even slower this time around because he will take longer to heal.

The good news is that I have managed to keep his cone on this time, so hopefully his incision will heal a lot faster, with less scarring.

Hopefully he will start feeling better soon - I will keep you posted!

I mentioned in my last post that last week we were blessed with some warm, sunny, spring-like days.

One of the nights we had a fire on the deck and ate BBQ chicken and coleslaw.

It was wonderful and made me anxious for spring.

Today it is freezing cold, with 40 mile per hour winds and snow.

Mother nature is such a tease.

Anyway!

I had one leftover chicken breast, and a little bit of coleslaw, so I made this sandwich.

It is modeled after my Pulled Pork sandwiches, with the addition of pepperjack cheese.

Holy delicious, Batman.

Here's the food porn:


If you don't already have a grilled BBQ chicken breast, you could substitute rotisserie chicken or just regular chicken breast instead.

As usual - check out the printable recipe at the very bottom of the post for a photo-and-rant-free version.

Yeah, baby.

BBQ Chicken Sandwiches (makes 2 sandwiches)
  • 1 boneless, skinless chicken breast, grilled
  • 2 whole wheat hamburger buns
  • 2/3 cup of creamy coleslaw
  • 2 tablespoons BBQ Sauce
  • 2 ounces pepperjack cheese, sliced
  • 2 medium sized dill pickles, sliced thinly
Cut each bun in half, place cut side up on piece of aluminum foil on rack in oven. Turn the broiler on low and leave the oven door cracked. Check frequently (don't walk away). When buns start to get crispy, add pepper jack cheese to the bottom halves of the buns. Continue to broil with the door cracked until the cheese is starting to melt and the buns are getting slightly brown.

Slice the chicken breast thinly (warm it up if it's not warm already). Divide the chicken in half between the 2 buns.

Top each with 1 tablespoon BBQ sauce, 1 pickle and 1/3 cup of coleslaw.

Enjoy!!!

Printable Recipe

December 6, 2010

Pasta with Italian Sausage and Roasted Red Pepper Tomato Sauce

Yum. I posted this recipe last spring (which is a similar recipe), in anticipation of a long and plentiful tomato season.

It is adapted from a recipe that my "Auntie" Gale made for me when I was living in North Carolina and she came to visit.

That was 8 years ago, and I have been making different adaptations of it regularly since.

Kempton was just a tiny baby then. 

This time of year, I am either using frozen tomatoes out of my summer stash, or the canned/boxed kind, but you could also use fresh.

To be honest, if you really needed a fast dinner you could buy a jar of pre-made Roasted Red Pepper Tomato Sauce.

But I would recommend making your own - it tastes better and you will feel better serving it your family.

Plus, what would I do to relieve stress if I wasn't making complicated recipes from scratch on weeknights?

So you're support of this blog is actually contributing to the improvement of my mental health!

Huh?

Anyway...

For my recipe I also used Steve's family's homemade Italian sausage, but you can use store bought bulk or links.

If you don't know how to roast peppers, check out my previous post for a step-by-step!

One other thing - you could add mushrooms if you had them on hand. Just saute them while you are sauteing the onions and garlic! 

Try this soon - you'll love it!


Pasta with Italian Sausage and Roasted Red Pepper Tomato Sauce (serves 8)
  • 1 lb penne pasta
  • 1 lb hot Italian sausage
  • 52 ounces of undrained diced tomatoes (I used 2 26 oz boxes of Pomi tomatoes)
  • 2 roasted red peppers (see previous post for step-by-step), peeled and diced
  • 1/2 yellow onion, diced
  • 4 cloves of garlic, minced
  • 4 oz sun-dried tomatoes packed in oil, drained and chopped
  • 2 tablespoons dried basil
  • 1/2 - 1 teaspoon crushed red pepper (less if you don't like spicy)
  • 1 teaspoon kosher salt (or to taste)
  • 1 teaspoon cracked black pepper
  • 1/2 teaspoon white sugar (or to taste)
  • 4 oz crumbled feta cheese (you could sub goat or Parmesan cheese), plus more for serving
Heat a large skillet or dutch oven over medium high heat. Add Italian sausage, onion and garlic. Cook until sausage is brown and onion is tender.

Add tomatoes, roasted red peppers, sun-dried tomatoes, basil, red pepper, salt, pepper and sugar and bring to a low boil.

Reduce heat and simmer sauce for 30 minutes or until it is your desired consistency, adding salt, sugar and red pepper to taste.

While sauce is cooking, cook pasta according to package directions.

Toss cooked noodles with sauce (adding half at a time - you want to make sure you have plenty of sauce), add feta cheese and toss to combine.

Serve with extra feta

Enjoy!

Printable Recipe

    December 3, 2010

    How to Roast Bell Peppers

    This is a prequel to my next recipe post, which is a delicious pasta dish that uses roasted red peppers and tomatoes as the base for the sauce.

    Before I realized how easy it was to make them at home, I would buy bottled roasted red peppers at the store.

    Now I make my own at home all the time.

    Not only is it easy and cheap, but it eliminates the additives and preservatives that you find in the stuff in the jar.

    Here is the step by step:

    1. Wash peppers and place them on a baking sheet and into the oven.

    2. Turn on the broiler (mine has a high/low setting, and I use the high setting), and crack the oven door.

    3. Keep a close eye on these babies - the temp is very hot! When the side that is facing up begins to blacken, turn peppers over to blacken the next side. They will start to look like this:


    4. Continue turning peppers until all sides are blackened.

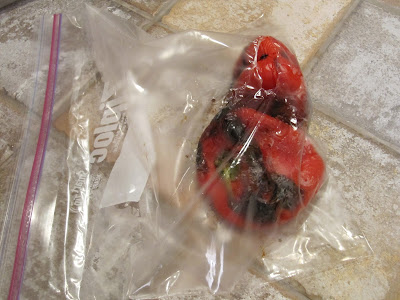
    5. Remove from heat and immediately place in a bowl covered tightly with plastic wrap. I used a zip top bag this time, and I wouldn't recommend it...those peppers are HOT and can easily melt a hole through the plastic.


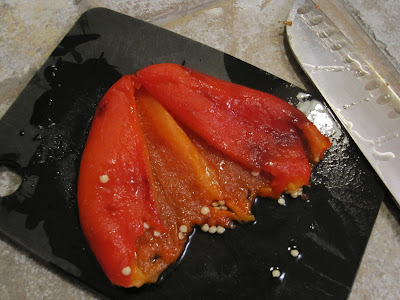
    6. Once peppers are cool, removed them from bowl and peel the skin (it should come off easily).

    7. Remove the top of the pepper, and the seeds.


    8. Slice/dice and use as desired. If you want to roast peppers in bulk, you can freeze them between sheets of wax paper (these should last for several months), or cover them in olive oil and refrigerate them (should keep for a couple of weeks).

    Use the peppers in sauces (recipe coming soon), salads, on sandwiches, or puree and use in dressings or hummus. Yum!

    Printable Recipe

    December 2, 2010

    Macaroni and Cheese A La Steph! (Kid Friendly!)

    It's been a while since I posted a recipe.

    Things have been busy and I have been preoccupied, but don't worry!

    When I stress, I cook.

    When I cook, I eat.

    When I eat, I feel better!

    I just haven't got around to posting much...

    To break the cycle, I am going to tell you about a recipe that I adapted from a recipe that my sweet soul friend Stephanie gave me.

    Macaroni and Cheese.

    Who doesn't love it?

    She gave me this "lightened up" version almost a year ago, and I have to admit...I was a little scared to try it.

    One of the main ingredients is...light mayonnaise.

    Now don't hate or close your browser window - I know what you are thinking.

    Mayo? And not just any mayo, but light mayo?

    Trust me, it scared me off for a long time.

    But last week, I was craving hearty comfort food (preferably without the love handles), and this came to mind.

    So I dug it out.

    When I bought the ingredients, I was planning on it just being me for dinner.

    But then Steve called and said the kids would like to come by (it's the excuse he uses when he wants to see me but doesn't want to admit it...blames it on the kids...hee hee), and I figured I would use them all as guinea pigs!

    That's how I roll.

    I was really impressed.

    The kids loved it.

    Even Andy.

    The picky one.

    And then I kicked myself for not trusting my Stephanie's judgment sooner.

    A lower fat mac and cheese that's kid friendly too?

    Brilliant!

    Don't get me wrong, this isn't necessarily healthy.

    Very few dishes that involve 3 cups of cheese and a pound of pasta are healthy.

    But it probably has less calories than most mac and cheese recipes (or at least that is what I am choosing to believe).

    I changed a couple of things (surprise!), and I am going to post the recipe that I made...but I will put some tips/variations at the end for you so you can make it your own, ok?

    Ok!

    Macaroni and Cheese A La Steph (serves 8)
    • 1 lb of your favorite short pasta (I used rotini but you could use elbow macaroni or other)
    • 1 can of cream of chicken soup
    • 1 cup of light mayo
    • 3 cups of grated sharp cheddar cheese
    • 1/2 cup of milk to thin
    • salt and pepper to taste
    Preheat oven to 350 degrees.

    Cook noodles al dente, drain. Add remaining ingredients and stir and completely combined, adding salt and pepper to taste as necessary.

    Transfer to an oven safe casserole dish or pan.

    Cook uncovered for 15 - 20 minutes or until heated through.

    Enjoy!

    * To really make it light, you could use low fat cream of chicken soup and reduced fat cheese. Be careful though, as this might change the texture
    * Steph said she usually crushes up whole wheat crackers and sprinkles them on the top...you could also use panko or Italian bread crumbs. I did none of these, because Andy likes things very plain.
    * Steph also mentioned that you could add cooked chorizo sausage, bacon, or Italian sausage to this...I have not tried that yet (again, for fear that Andy wouldn't eat it).
    * You could also add cooked broccoli, asparagus, spinach, cauliflower, or anything else that would contribute to your illusion of healthiness.

    Thank you for the recipe, Steph! I will never doubt you again. xo

    Printable Recipe

    August 19, 2010

    Sweet and Savory Chicken Legs and Grilled Zucchini Chips

    My hot water heater shit the bed last night.

    Steve and I went out for sushi and then to the movie Eat, Pray, Love (I didn't even have to take him against his will! I think I'll keep him), and when we came back it smelt like something was burning/melting...

    It was the hot water heater. I don't know what is wrong with it or if it's fixable or how much it will cost to replace. All I know is that if it would have started my house on fire with Kempton inside of it, there would not be words for how unhappy I would be right now. Just that fact alone makes me want to bring him to work with me every day.

    Or put in a doggy door.

    Except that it would probably also be a skunk door, a raccoon door, a mouse door, and a spider door. UGH.

    Either way, everyone is fine and the hot water heater is no longer hooked up to a power source and Steven is going to help me figure out what I need to do.

    Preferably today, because after I go running I will be in need of a warm shower.

    In the meantime, at Georgia's request (and because I totally forgot), I am going to turn my attention towards food and post the recipes for the Sweet and Savory Chicken Legs and the Grilled Zucchini Chips that I made a couple weeks back...

    The chicken was good - I am not a huge fan of chicken thighs/legs/drumsticks, but I wanted to try this recipe exactly as is for the first time. Next time I might use chicken breasts instead. The flavors were really good, and you could definitely tweak it to turn down the heat if you were cooking for those with sensitive palettes, or turn it up for people like...me!

    Turns out I didn't make the recipe exactly as is.

    Shocking, I know.

    I only used one package of legs instead of two, but I used the full amounts of everything else (I wanted extra sauce because I put it over white rice).

    Also, it was hot out and I didn't want to start the oven. So I used the grill instead!

    I will post both methods, as well as the zucchini recipe I used for the side dish. These turned out really good.

    Unfortunately, Steve doesn't like zucchini so he wasn't super impressed.

    The other bad news is that I didn't get any "after" pictures...just "before" ones. We didn't eat until really late that night and it was very dark out by the time we pulled the food off of the grill. Here are the before pics:

    The chicken, before it went on the grill. Imagine the perfectly cooked chicken bathed in the sauce, the sugars all caramelized, making it thick and dark.

    Imagine this raw zucchini marinated, grilled, sprinkled with Parmesan cheese and delicious, ok?

    Enjoy!

    Sweet and Savory Chicken Legs (adapted from the recipe Hot & Sweet Drumsticks by Teri L. on Tasty Kitchen*) this version will serve 3, but can be easily doubled
    • 1 package chicken legs/drumsticks (a little over 1 pound...my package had 6 legs in it)
    • 1 cup of apricot preserves
    • 1/2 cup ketchup
    • 1/4 cup soy sauce
    • 2 teaspoons minced garlic
    • 2 teaspoons hot pepper sauce (I used Sriracha, but you could use anything)
    Combine preserves, ketchup, soy sauce, garlic and hot pepper sauce in a small saucepan and heat (stirring frequently) until the preserves are melted and everything is combined to form a sauce that is about the same consistency as honey.

    For the oven: Preheat oven to 350 degrees. Place drumsticks in a single layer in a baking pan and pour apricot mixture over the top. Bake for 40 minutes or until the chicken is cooked through, spooning the sauce over the chicken periodically.

    For the grill: Preheat the grill to 400 degrees. I lined a baking dish with aluminum foil (easier cleanup) and put the drumsticks in a single layer, then I poured the sauce over top. Cook until chicken is done (on the grill it took about 60 minutes, but I cooked it indirectly for the first 40, then realized it wasn't cooking fast enough and put it directly over the coals for 20 minutes and they were done. If you cooked them directly the whole time it would probably only take 30 - 35 minutes), frequently spooning the sauce over top.

    Let the chicken sit for about 5 minutes before serving. Serve over white rice to soak up the yummy sauce!

    Printable Recipe

    Grilled Zucchini Chips
    • One large zucchini, sliced into thin rounds
    • 1/3 cup of olive oil
    • 1/3 cup of balsamic vinegar
    • kosher salt and fresh cracked black pepper
    • a couple pinches of crushed red pepper flakes
    • 1/2 cup of grated Parmesan cheese
    Toss sliced zucchini with olive oil, balsamic, salt, pepper, and crushed red pepper. Marinade for at least 30 minutes. Preheat grill to 400 degrees. Grill each side of the zucchini rounds over direct heat for 2 - 4 minutes per side, or until they are browned (I ended up flipping some of the larger slices a couple of times until they were done). Working quickly, remove them from the grill and lay them in a single layer on a baking sheet. Sprinkle immediately with parm cheese. Serve. 

    Printable Recipe

    * A note about Tasty Kitchen: for those of you who do not know, this is a recipe sharing site that The Pioneer Woman created. It is not made up of celebrity chefs (though there are some seriously awesome food bloggers on the site), but mostly home cooks like you and me. I would encourage you to check it out the next time you are looking for a recipe. Here is the website: http://thepioneerwoman.com/tasty-kitchen/
    And if you decide to create a profile and start sharing recipes, my profile name is: Lindsey @ Sunshine and Jellybeans...look me up and be my friend!

    August 17, 2010

    Pulled Pork and Creamy Coleslaw Sandwiches

    Does anyone ever actually make any of my recipes?

    I just wonder because I rarely get any feedback on them...and right now according to Google Analytics (thanks Tara!), I am averaging around 400 visits per month (On my silly little site! Can you believe it?! So proud!). I realize that there are a handful of people that visit several times per month, but people usually only post comments or send emails when it is something about my personal life...

    Which I love and appreciate very much, by the way. I was just wondering, you know - if anyone tries the recipes...and if so, do you like them?

    You know what they say about opinions...

    ...feel free to shout out yours! It can even be negative feedback, as long as it is respectful. Or perhaps any suggestions?

    But even if no one else on earth makes one of my recipes, I will continue to post them. Mostly because it makes me happy. And hungry. And this is a great way to keep all of my favorite recipes on file! And I not only have the recipe, but I have my thoughts on the recipe, as well as (sometimes) some pictures.

    Which brings us to today's recipe...

    I know I have posted a Pulled BBQ Pork recipe here before, but I have since tweaked it (surprise!) and made it my own, so I wanted to give it another post. Plus I actually took some pictures. And I found a coleslaw recipe that both Steve and I really like (and we are picky coleslaw eaters!).

    Oh yum. Juicy pulled pork with coleslaw and sliced dill pickles. This is a great recipe for a crowd because it makes a lot of pork, and it is easy because you cook it in the crockpot! It is also kid friendly (if you lay off the cayenne pepper).
     

    Here is the pulled pork recipe first, then the coleslaw recipe...Enjoy!!!

    Pulled BBQ Pork (serves 16 - 20)
    • 5 lb pork butt (pork shoulder)*
    • 1 medium onion, chopped
    • 2 cups ketchup
    • 1 cup apple cider vinegar
    • 1 cup of brown sugar
    • 5 tablespoons Worcestershire
    • 5 tablespoons yellow mustard
    • 1 tablespoon paprika
    • 6 cloves garlic, minced
    • 1 - 2 teaspoons cayenne pepper (more or less to taste)
    • 2 teaspoons salt
    • 2 teaspoons pepper
     Throw chopped onion in the bottom of a large crock pot, lay pork on top. Whisk together remaining ingredients. Taste. Does it need more vinegar? More cayenne pepper? More salt? Adjust seasonings to taste, then pour 2/3 of the bbq sauce over pork in crock. Cook on low heat for 8 - 10 hours or until pork shreds easily with a fork. Once pork is shredded (keeping it in the crockpot), you can add remaining sauce, if necessary. I like my pork to be saucy...if you don't, you can pass remaining sauce with pork when you serve it. Just make sure that pulled pork stays moist. Serve on a bun with sliced dill pickles and coleslaw (recipe below). PS - this is a great bbq sauce recipe for bbq chicken or ribs too!
    * If you use a leaner cut of meat, you may need extra sauce.

    Printable Recipe


    Creamy Coleslaw (serves 8 - 10 on sandwiches and can easily be doubled)
    • 1 14 oz bag of coleslaw mix (yes, you can certainly shred your cabbage and carrots at home if you want to)
    • 1/2 cup of mayo
    • 1 tablespoon of olive oil
    • 2 - 4 tablespoons of sugar (3 is just about perfect for me, but start with 2 and add to your liking)
    • 2 tablespoons Cider Vinegar
    • 1 teaspoon celery salt
    • 1 teaspoon onion powder
    • fresh cracked pepper
    Combine all ingredients in a large bowl, cover and chill for at least 2 hours, stirring occasionally. Serve on top of pulled bbq pork (or chicken). Don't forget the pickle slices!

    Printable Recipe

    July 14, 2010

    Spaghetti and Meatballs...from scratch

    My camera is broken. It must of have got sand in it while we were at the beach last weekend...the lens won't even open. I think Steve brought it in to get looked at, but in the meantime......

    Instead of my terrible point and shoot pictures, you are going to be subjected to my terrible iPhone pictures!!! Hooray!!! Sorry. Anyway...

    I wanted to make something special for the kids (by special, I mean delicious and healthy) for dinner on Tuesday night because: 1. I kinda like them, 2. I love to cook, and 3. I know Steve doesn't love to cook - especially on weeknights when he has the kids because time is so limited. I have been probing them about food lately (Do you like this? Do you like that? Have you ever tried this?), and found that they ALL like spaghetti...Katy and Chris with meatballs, Andy without (but he said he would be willing to pick them out).

    Then, Steve's mom gave me a pile of fresh basil from her garden (as you will see in a future post, my basil is still limping along), and I promised Katy that I would make her something with it.

    *Lightbulb!* I could make spaghetti and meatballs with fresh tomato basil sauce!!! Plus, I have large quantities of Steve's family's homemade Italian sausage in the freezer which would be perfect mixed with beef for the meatballs! It just seemed meant to be.

    So, Monday after work I went to the grocery store, armed with my list.

    I got home around 5:15pm and went to work.

    Steve and the kids were out of town for soccer, so it was perfect. I could make the meal, put it in the fridge overnight, and then on Tuesday night while I was at yoga, Steve would have a delicious home-cooked meal to serve the kids.

    Holy labor intensive, batman.

    I have never made meatballs before...I usually prefer bulk hamburger, venison or sausage mixed in with my spaghetti.

    And evidently I usually make real tomato sauce on weekends when I have plenty of time to cook. Or I just make it from canned tomatoes. Or something.

    It was 9:30pm before I was done. And that didn't include cleaning up or letting the sauce cool enough to put it in tupperware.

    Can you say "Meal of Love"???

    All I could think was that they better really enjoy this dinner. Which, according to Steve - they did. Although, after finding out how much effort went in to it, I think he would be afraid to tell me anything different.

    But I thought it was delicious! So I am going to share the recipe with you. Just be forewarned that this probably isn't a good weeknight meal...unless you don't have a job, or can start early afternoon. Enjoy!


    Meatball! (Again - sorry for the terrible pics)

    Yum! I used whole wheat fettuccine noodles because that was all I had. I told Steve to pick up some thinner pasta for the kids though.

    My table for one, outside on the deck with a much needed glass of wine (I had to sample it before I fed it to the kids, right? I mean, what if it was disgusting?).

    Spaghetti and Meatballs (serves 6 - 8)

    Sauce:
    • 5 lbs fresh or frozen tomatoes, cored (And peeled if you desire. I didn't.)
    • 4 - 5 garlic cloves, minced
    • 1 medium onion, chopped
    • 3 tablespoons butter (or olive oil)
    • 4 whole carrots, chopped (I was sneaking veggies in! hee hee hee)
    • 1/2 cup of white wine (don't worry - the sauce cooked for about 4 hours, so the alcohol was gone)
    • 1 1/2 cups of fresh basil
    • 1 tablespoon of sugar (depending on the sweetness of your tomatoes, you can adjust this)
    • salt and pepper
    • 2 - 3 teaspoons of beef bouillon
    • dried or fresh oregano and thyme
    • 2 pinches of crushed red pepper flakes (adjust to your tastes)
     Melt butter in large sauce pan or soup pot (I use my enamel coated cast-iron dutch oven), saute onion, carrot and garlic until tender. Add wine, let simmer for 3 - 5 minutes. Add tomatoes and let cook for 1 - 2 hours, or until tomatoes are broken down (while this is cooking, you could assemble the meatballs...if you were smart...and didn't want to create a new playlist for your ipod to listen to while you were running). Reduce heat to low. Add basil and if desired, blend with an immersion blender until desired consistency is reached (you could also use a blender or food processor, or just chop tomatoes and basil into small pieces). Season with sugar, salt, pepper, oregano, thyme, and crushed red pepper.Continue cooking on low until you are ready to add the meatballs (see below).

    Meatballs:
    • 1 lb. ground beef
    • 1 lb. bulk Italian sausage
    • 1 cup panko bread crumbs (or you could use regular bread crumbs)
    • 2 eggs
    • 1/2 cup of fresh grated Parmesan cheese (grate extra for topping pasta)
    • Italian seasoning
    • 1/2 cup of milk
    • 2 tablespoons olive oil plus 2 tablespoons vegetable oil for frying
    Combine all ingredients in a large mixing bowl. Mix with hands until combined. Roll meatballs into golf ball sized pieces (I got almost 20), and set aside. Heat oil in a skillet over medium - medium high heat. Fry the meatballs in batches (don't crowd them) until they are browned on each size. This took me about 10 minutes per batch and I did it in 2 batches. When they are good and brown, place on a plate lined with paper towels to drain. After all meatballs are browned, increase sauce heat to simmering. Place meatballs in sauce, cover and let cook for 30 minutes.

    While meatballs are cooking, cook spaghetti noodles until al dente, heat up some garlic cheese bread, and make a salad. Check the seasonings in the sauce one more time and add salt, sugar or spices if necessary. Serve spaghetti and meatballs with a generous topping of Parmesan cheese. Enjoy!!!

    Printable Recipe

    July 6, 2010

    Pasta With Vodka Sauce (aka cooking for adults!)

    I hope that everyone had a fabulous 4th of July weekend! Steve and I were up at the cabin from Thursday afternoon until late last night (it is always so hard to leave!) (and why is the nicest day of the weekend always the day that I have to go home??), and we had an awesome time. I have millions of pictures that I haven't even uploaded yet, and hopefully before next July I will post them! 

    As you know, I have been cooking for Steve's kids (aka delicate taste buds) lately...and even when I am not cooking for them, I am thinking about what I could cook that they would like and stressing myself out about coming up with relatively healthy, delicious meals that don't taste like sawdust to me. 

    Last week I threw all of those worries out the window. I didn't have to cook for them at all (besides bbq chicken on Sunday...and PS - Chris doesn't like chicken...which I didn't know until after dinner was ready) during the week, so I took advantage of the opportunity to cook for myself! Yay!

    At this time, I would like to discuss cooking with alcohol. You all know that I do it, and that I love it. I add wine to sauces even when it doesn't call for it. I cook with beer instead of water whenever possible. And I've always been under the impression that the alcohol "cooks off". It doesn't. Not for a long, long time anyway. Seriously. While I was pondering making a sauce with almost a cup of vodka in it (see recipe at the bottom of this post), I starting wondering if booze really does evaporate or cook off or magically go away. I've never really cared before, because I am usually only cooking for myself and other adults. But in the off chance that I could get Steve's kids to eat something wonderful that involved a 1/2 cup of wine or possibly some vodka, I figured I'd better double check. Here is what I found:

    PREPARATION METHOD
    Alcohol
    Retained
    No heat application, immediate consumption
    100%
    No heat application, overnight storage
     70%
    Alcohol ingredient added to boiling liquid, and removed from heat
     85%
    Flamed
     75%
    Baked, approximately 25 minutes, alcohol ingredient on surface of mixture (not stirred in)
     45%
    Baked/simmered, alcohol ingredient stirred into mixture 15 minutes
    30 minutes
    1 hour
    1.5 hours
    2 hours
    2.5 hours

      40%
     35%
     25%
     20%
     10%
      5%
    source: Minnesota Nutrition Council Newsletter


    So, um, yeah. Basically what that means, is that aside from my Crockpot Beef, which cooks in the crock pot overnight...pretty much everything else I add alcohol to still contains a percentage of the booze when I serve it. Yikes. Again - if I am cooking for myself, who cares? A half a cup of wine mixed in to a sauce that will make 4+ servings isn't going to effect me. I just thought ya'll should know in case you are having some kid-folk over for dinner. 

    Now on to the Vodka Sauce! Yippee! This recipe is based on PW's "Pasta alla Vodka" 


    Pasta with Vodka Sauce (adapted from the Pioneer Woman)

    • 1 lb of pasta, cooked according to package directions (as you can see from my pic, I used medium shells...but you could use whatever your heart desires!)
    • 2 Tablespoons of butter
    • 2 Tablespoons of olive oil
    • 1/2 of a medium onion, minced  (PW's recipe calls for a whole onion, but I find that too overpowering for me)
    • 2 cloves of garlic, minced
    • 3/4 cup of vodka (PW calls for up to one cup, but 3/4 cup is PLENTY)
    • 1 can of tomato puree (14.5 oz)
    • 1 cup of heavy cream* (you could sub half n half)
    • salt and pepper
    • crushed red pepper (she called for a pinch...I used a few pinches because I am tough)
    • 1 cup grated Parmesan cheese
     Heat butter and olive oil in a large skillet over medium heat, saute onion and garlic until tender. Stir in vodka and let cook for 5 minutes. Stir in tomato puree and turn heat down to low. Once sauce has cooled a bit, add in cream. Season with salt, pepper and crushed red pepper. Toss in drained pasta and Parmesan cheese. Add more salt, pepper, or crushed red pepper if necessary. This would also be great with some leftover grilled chicken, or some shrimp mixed in. Enjoy! 

    *As you may know, heavy cream makes my stomach very unhappy. This recipe was no exception (1 cup of heavy cream is a lot of heavy cream), but it tasted so good that I didn't care. Sorry if that was too much information, I just wanted you to know that it was delicious and worth every bite.  

    Printable Recipe 

    June 17, 2010

    Kid Friendly Chicken and Broccoli Mac N Cheese

    Ok. This recipe was good, but it wasn't earth shattering. Unfortunately, I have a feeling that is why it was kid friendly.

    Now begins my rant...

    I'm starting to suspect that cooking for Steve's kids is going to mean cutting back on a lot of the flavor in certain dishes. Moms - is that true? Do you have to cook bland for young children? Or am I being over-paranoid or ultra-sensitive? I realize that I'm not an expert, but I have been secretly cooking for Steve's kids for months (meaning I cook, he takes it home, heats, serves...and gets the credit for it - which I don't mind tooooo much...he he he), and it seems like most of the dishes that they like are watered-down-in-flavor compared to my preferences (leave some of the heat out of the chili, finely dice and hide some of the vegetables in soups, use a milder cheese for the pasta, etc). Do most people cook differently for their kids? Do kids have really sensitive palettes? Or do you just cook like normal and let them slowly adapt to your tastes?

    Either way - at this point, I am trying to convince them to try new things (I think their culinary existence prior to this was pretty boring, as was Steve's when we first met) without scaring them off of eating...and eventually cooking. When I decided to make this dish (and chose to use white cheddar) it was going to be for myself, Tara and Eli...I didn't plan on Steve and the kids joining us. I was a little worried that the flavor explosion that is white cheddar would be too much for the kids, but for whatever reason, the white cheddar that I used was very mild. Probably the reason why I didn't think it was earth-shattering but the kids loved it. If your white cheddar is very sharp (and you are cooking for kids with sensitive palettes), you may want to mix in some mild cheddar or (gasp!) American cheese. I know.

    Here are the two recipes that I used as inspiration and guides for this recipe, and see below for my version:

    Pasta with Roasted Garlic, White Cheddar, and Wine Sauce from Annie's Eats

    White Cheddar Chicken Pasta from Homemade by Holman

    PS - this is a little labor intensive for Mac N Cheese


    Chicken and Broccoli Mac N Cheese

    • 1 lb boneless, skinless chicken breasts
    • 3 - 4 cups white cheddar cheese, grated (or whatever kind of cheese you want)
    • 1 head of broccoli, chopped to make bite sized florets
    • 1 cup of milk (you could use half and half)
    • 1 lb pasta (any kind you want - I would recommend rotini though)
    • 1/4 cup of dry white wine
    • 1 tablespoon dijon mustard
    • 2 tablespoons butter
    • 2 tablespoons flour
    • 1 cup low sodium chicken broth
    • 1 head of garlic
    • thyme, oregano, crushed red pepper flakes
    • salt and pepper
    First, roast the head of garlic by cutting the top off of the head (so all the cloves are exposed), drizzling it with olive oil and wrapping it in foil. Bake at 350 degrees for an hour. Set aside. Side Note: Roasted garlic is delightful and wonderfully mild. Use it in everything, or just eat it on a toasted baguette. Yum!

    Trim any icky stuff off of the chicken breasts, season liberally with salt and pepper. Grill until done. I know this might seem a little excessive, but the grill taste (especially if you are using a charcoal grill) really adds something special. You could also season the chicken with Italian seasonings, or more Dijon mustard (if that's how you roll). Chop the grilled chicken into bite sized pieces. Set aside.

    While the chicken is cooking, blanch the broccoli until crisp-tender and cook the pasta until al dente. *Tip* throw the broccoli into the simmering pasta and water for the last 3 - 4 minutes of cooking and save yourself a pot to wash! Drain pasta and broccoli, set aside.

    Melt butter in a dutch oven, and squeeze the garlic into it. Cook and stir for a couple of minutes. Whisk in the flour (making a wonderful smelling roux), cook for 1 - 2 minutes. Add the wine and the broth, let it simmer (stirring) for about 5 minutes or until it has thickened and reduced down. Add the mustard. Slowly whisk in milk and cheese, stirring constantly. Season to taste with thyme, oregano, red pepper flakes, salt and pepper. If the sauce is too thick, add more milk or broth. If it is too bland or thin, add more cheese and spices. When the cheese sauce is seasoned to your liking, add cooked noodles, chicken and broccoli. Toss to coat and serve!

    Seriously - any advice on cooking for kids would be accepted and much appreciated!

    Printable Recipe

    May 13, 2010

    Can we talk about tomatoes?

    I'm sure you know this by now, but I love tomatoes. Tomatoes and basil, sun-dried tomatoes, roasted tomatoes, plain tomatoes, tomatoes drizzled with balsamic vinegar, tomato soup, tomatoes in salads, on sandwiches, and of course - tomato sauce. I have posted a few tomato-based recipes on this website (sundried tomato pasta salad, roasted tomato sauce, super fast tomato pasta, tomato-basil soup, pizza sauce), as well as things that contain tomatoes, but aren't necessarily based on tomatoes (like chili). I have tomatoes on the brain because Steve and I built a garden this weekend (I helped! I helped! I ran the screw gun...for a little while.) and I am so excited to plant it. Usually I plant in containers and put them on my deck, but with the new patio furniture/fire pit, there isn't room! So we built a 4 x 16 raised vegetable bed! Yay! Along with tomatoes, I also like to grow basil (surprise!), peppers (bell and jalapeno), onions, peas, lettuce, cilantro, and Steve wants to grow green beans. I will post more about this and show you some pictures later. Today we are talking about tomatoes! I have one bag of frozen tomatoes in my freezer that I need to eat up right away, because soon the farmer's market will have yummy tomatoes available, and then eventually, my tomatoes will be ripe and ready, and I will be freezing this year's batches...so I wanted to post a couple more tomato sauce recipes. The first one is a recipe that my friend Heather sent me some time ago, but I never got around to make it. However, it is kinda similar to a recipe I have been making for years - a recipe that was taught to me by my "auntie" Gale when she came to visit me when I lived in North Carolina, and that I have since adapted. Both are easy and yummy. I hope you enjoy! And grow some vegetables - it is delicious and healthy and therapeutic!

    Spicy Sausage Linguine in Tomato Cream Sauce (from Heather)
    Shallots (I usually just use onion…to taste)
    3-4 cloves garlic
    Olive oil
    1# spicy Italian sausage (or mild sausage will work, but I know you’re not a pansy)
    2 cans diced tomatoes (I usually get one with chilies in it)
    1 cup heavy whipping cream (half & half will work but it’s not as good)
    ½ t crushed red pepper
    Other spices to taste (it calls for sage, but I never have that)
    Linguine
    Parmesan cheese
    Sauté shallots and garlic in olive oil until tender.  Add sausage and break apart while cooking.  Once sausage is cooked, add tomatoes with juices.  Add crushed red pepper and other seasoning to taste.  Simmer about 5 minutes.  Add cream.  Simmer another 5 minutes until thickens.  Server over linguine and top with parmesan cheese.  Delicious!

    Do you like how she confirms that I am not a pansy?! Thank you Heather!!! I most definitely would put spicy Italian sausage in my pasta. The second recipe is similar...and I guess it could be called Spicy Sausage Penne in Roasted Red Pepper Tomato Sauce! When I first started making this, I used a store bought jar of roasted red pepper tomato sauce (like Emeril's)...that is perfectly acceptable. You could also use canned diced tomatoes instead of fresh (like the recipe above). However, if you have tomatoes to use up or need to control the sodium level (or just like to cook from scratch), here is the homemade-sauce version. Thanks Gale!

    Spicy Sausage Penne in Roasted Red Pepper Tomato Sauce

    1 large red pepper, roasted under the broiler or on the grill, peeled and chopped
    2 lbs of ripe tomatoes (preferably roma), chopped
    1 lb bulk spicy Italian sausage
    1 handful of sun-dried tomatoes, chopped or julienned  (optional)
    1/2 medium onion, chopped
    3 - 4 cloves of garlic, minced
    Olive Oil
    Crumbled goat cheese (or if you don't like goat cheese, sub parmesan...I've even subbed feta before)
    fresh or dried basil, oregano, thyme
    crushed red pepper flakes
    kosher salt, fresh cracked pepper, sugar
    penne pasta, cooked according to package directions

    Brown sausage, remove from pan with slotted spatula, set aside. Saute onion and garlic in sausage drippings (add olive oil if necessary) until tender. Add tomatoes, red pepper, and herbs. Cook until the tomatoes of broken down. If desired, use an immersion blender to puree...otherwise just keep breaking up large chunks with back of a wooden spoon. Check seasonings...add sun-dried tomatoes, salt, pepper, sugar, crushed red pepper, and if necessary - a teaspoon or two of red wine vinegar. When the sauce is to your taste, toss in cooked sausage, cooked penne, and goat cheese. Toss to combine and enjoy!

    April 27, 2010

    Easy Cheese Sauce

    Mmmmmmmmm - cheese sauce. My mom used to make it to pour over steamed broccoli and cauliflower when I was a kid...and I'm sure parents everywhere have been using this approach to trick kids into eating vegetables for centuries. I was intimidated by the cheese sauce for a long time (that and gravy)...but once I finally just did it, I realized that it was actually really easy (that and gravy!).

    You basically make a roux...and stir in your favorite cheese! The end. Seriously - that is all. You don't know how to make a roux? Ok, I'll tell you. Here are more specific instructions:

    Easy Cheese Sauce

    3 tablespoons butter
    3 tablespoons flour
    1 cup of milk
    1 cup of cheese, grated. I used half medium cheddar and half sharp white cheddar.
    Salt and pepper

    Make a roux by melting the butter over medium/medium-high heat in a saucepan and then stirring in the flour. It will be really thick, so start whisking in the milk (I used skim because that's how I roll...it would be richer and creamier...and more fattening...if you used half and half instead). Once the milk is added and heated through, stir in the cheese. Season to taste with salt and pepper. Resist the urge to drink it straight out of the pan.

    PS - You can always add more than a cup of cheese. If it gets too thick, add more milk!

    Printable Recipe

    March 29, 2010

    Roasted Tomato Sauce - Part I of "I can't stop cooking and eating Italian food!"

    This is the first in a 341 part series about my obsession with Italian food since I came home from my trip! Please send a crane to lift my ass out of my chair.

    Just kidding! Kind of.

    I think I am over my Italian food obsession now. I can eat other cuisines without feeling like I'm wasting an entire meal on something that doesn't include tomatoes, basil or mozzarella cheese. For instance, I am planning a deck party for this week to celebrate the nice weather, and I am thinking about making pulled pork sandwiches. ***As an entirely unrelated side note: This is how in tune my brother and I are...I think it has something to do with being reared by the same pack of wild dogs...I printed my recipe for pulled pork off of my blog this morning (this is also a very convenient way for me to keep all my recipes in one place!), and then my brother just called me 30 seconds ago and asked me a question about substituting something in my pulled pork recipe because HE IS MAKING THEM RIGHT NOW! He is half way across the country and we are thinking alike. Crazy, huh? I think I have him and Lyndi addicted to my blog. I imagine it is something like being addicted to a soap opera. They didn't start reading it until a couple of weeks ago, and I can picture them sitting down at night, after dinner, and reading my blog archives in their pajamas with a bowl of popcorn. By the way, he thinks I just stop all of this blogging nonsense, and just start a website with recipes. Little does he know that I am protecting both of our waistlines by not strictly posting about food.

    Anyway, back to the food. And back to my brother. Remember I told you in this post about how my brother gave me four giant bags of frozen tomatoes from his garden (my tomatoes got blossom end rot because I neglected them. I am a terrible, terrible person)? I used my second-to-last bag last Sunday (as in 8 days ago) to make homemade roasted tomato sauce. It actually had a similar flavor to my homemade tomato basil soup, but I changed the process a little bit, thickened up the consistency, and added some homemade Italian sausage...then I served it over whole wheat rotini with shaved Parmesan cheese. YUM!

    Here is the basic recipe (As usual, I use this term loosely):
    Roasted Tomato Sauce
    • 3-4 pounds whole tomatoes (fresh or frozen)
    • 1 medium sized onion (I always use yellow onions. Unless it calls for red.)
    • 4-5 cloves of garlic
    • 3-4 tablespoons olive oil
    • a couple of sprigs of oregano
    • a couple of sprigs of thyme
    • lots of basil...I used probably about 1.5 cups, if you packed the leaves in there
    • 1 small can of tomato paste
    • 1+ tablespoon of sugar
    • kosher salt and fresh cracked pepper
    • Pizza and Pasta Magic (optional)
    Pre-heat the oven to 325 degrees*. Cut the tomatoes in half, peel the garlic cloves, and cut the onion into large chunks. Throw all of this into a zip-top bag, add the olive oil, sprinkle in some salt, pepper, sugar, and Pizza and Pasta Magic. Shake it like a Polaroid picture! Ha ha - or just mix it around until everything is coated with the OO. Then, dump the contents of the bag onto a large baking sheet (flip the tomatoes if needed so that the cut side is up), and stick the sprigs of oregano and thyme throughout the mixture. Put it all into the oven and roast for 3 - 4 hours*. Transfer all of the contents of the roasting pan into a large dutch oven (including all the juices), add the basil and bring it to a soft boil, reduce heat and simmer for a little bit (I let it simmer for about an hour because I was making chicken noodle soup at the same time. It's called multi-tasking), then hit it with the immersion blender (or put it in a regular blender or food processor) to smooth out the texture (If you don't have any one of these, make sure to mince your garlic and onions before you roast them, and chop your basil before you add it. Then you can just mash it with a potato masher or the back of a big spoon to break down the tomatoes). Once it is at your desired consistency, season it to taste. You could add more salt, pepper, sugar, or Italian seasonings. Then just let it cook for another 30 - 60 minutes. I don't know why, but for some reason it doesn't matter how much seasonings you add, it doesn't get the desired flavor unless you just let it cook!

    At this point, you have several options. If you want, you can be done. Cook up some of your favorite pasta (I would use something delicate, like angel hair or orzo) and serve this with some Parmesan cheese on top. Or, you can add things to make it more substantial. For instance, at this point I took half of the sauce as is, and put it in the freezer for future consumption (maybe over cheese stuffed tortellini), then with the remaining half, I made it more man-friendly (I added meat). Steve's family makes homemade Polish and Italian sausage every year, so I browned up some bulk Italian and threw it in. You could also add mushrooms, ground beef, or any combination of those things. Or, if you were really feeling crazy, you could use this as the sauce for chicken parmesan. Just make sure to check the flavor after you make any addition! So fresh, so delicious. Enjoy!


    *There are so many different ways to roast tomatoes...anywhere from putting them in the oven at 400 degrees for 45 minutes, to putting them in at 200 degrees for 7 hours. It depends on how much time you have. I find that 325 degrees for 3 - 4 hours is somewhere in the middle. Either way, your house will smell phenomenal while they are roasting.

    Printable Recipe

    January 20, 2010

    Yummy BBQ Pork

    Tonight we are having leftover pulled BBQ pork (because I am getting sooooo tired of turkey) that I made a couple of months back and froze. Below is the recipe that I used, and if you can believe it - I barely changed anything. The only thing I did differently was to add the remaining bbq sauce to the pork towards the end of the cook time (to keep it saucy and moist)...and I melted provolone cheese onto the rolls and added sliced up pickles. If you want to, you could also put coleslaw (the vinegar based kind for true Carolina-style) on top of the meat in the bun. This one is definitely a keeper. Yum! Enjoy!
     
    PS - I am re-learning to love my slow cooker this winter! 
    PPS - This makes A LOT of pulled pork. Either make it for a small crowd/big family or be like me and freeze 1/2 of it!  
    PPPS (does that even exist? either way) - I know that I promised to post my white chicken chili recipe, and I will keep that promise! Soon!  


    Recipe from bakingbites.com :

    Slow Cooker Pulled Pork
    5-6 lb. pork shoulder/pork butt
    1 medium onion, thinly sliced
    1 cup ketchup
    2/3 cup apple cider vinegar
    1/2 cup brown sugar
    1/2 cup tomato paste
    3 tbsp Worcestershire sauce
    3 tbsp mustard
    2 tsp paprika
    2 tsp garlic powder
    pinch cayenne pepper
    1 1/2 tsp salt
    1 1/2 tsp ground black pepper
    3/4 cup water

    Place onion on the bottom of your slow cooker. Place pork shoulder, trimmed of any obvious excess fat, into slow cooker on top of onions.
    In a large mixing bowl, whisk together all remaining ingredients to form the barbecue sauce. Feel free to adjust salt and pepper to taste, if necessary. Pour half of the sauce over the pork and cover. Set remaining sauce aside.
    Cook over low heat for about 8 hours (or according to your slow cooker’s presets).
    Remove pork to a large bowl and shred with two forks. Transfer meat back into slow cooker and cook for a few more minutes, until meat has soaked up the sauce. Pulled pork can be held on the “warm” setting in the slow cooker for serving.
    Serve on soft sandwich rolls, topped with extra barbecue sauce.

    Serves 10-12.

    January 11, 2010

    Easy Chicken Enchiladas!

    Bear with me here, I don't use a recipe outside of the one in my head, which means each time is a little different. Plus I don't measure anything (which makes me a terrible baker), so exact amounts aren't really my strong suit.

    Oh, and also - I realize that this doesn't really fit in with me trying to lose weight. But on Saturday I went snowshoeing (over hilly terrain!), and I did 8 minute abs. And arms. So I deserve some cheesy, saucy, sour creamy deliciousness! Ha!

    Ingredients:

    1 lb of boneless skinless chicken breasts (fat and yucky stuff trimmed off)
    1/2 of an onion (more if you like onion better than I do)
    1 red pepper (you can use whatever color you want, just not green. It's less nutritious, and it doesn't fit well with this recipe. At least not in my head.)
    1 can of diced green chili's
    Jalapeno (fresh, canned, jarred, pickled - whatever and however much you want to add)
    1 can of Rotel tomatoes (or whatever diced tomatoes you have on hand)
    Black beans
    Canned Corn if you want...I don't like corn in salsa or in other mexican dishes :( yuck!
    Small tortillas
    2 -3 cans of enchilada sauce...I use half hot and half mild
    salsa (optional)
    Couple Tablespoons of Olive or Canola Oil
    2 cloves minced garlic
    Spices (salt, pepper, taco seasonings if you want, chili powder, etc if you want)
    Lime Juice (optional)
    Shredded cheddar cheese
    toppings! diced jalapenos, sour cream, cilantro, tomatoes, shredded lettuce, black olives, etc...depends on how fancy you want to get!

    This is how we do it:

    Cook the chicken however you want. If we were doing Difficult Chicken Enchiladas instead of Easy Chicken Enchiladas, I would tell you to simmer a whole chicken with peppers, onions and limes; then let it cool and shred it with two forks. But that is a lot of work, so I just boiled the boneless skinless chicken breasts in beer, let them cool, then chopped them up into small pieces. The beer is quite unnecessary...it was more of an experiment, but it didn't turn out to be any more tender or flavorful so go ahead and just use water (it's cheaper). The reason you don't want to saute the chicken breast is because it tends to get a tough skin on it when you cook it in hot oil directly on the pan.

    While the chicken is cooking, chop up your veggies and open up your cans. After the chicken is done, dump out the water (I just used a saute pan that had high sides), heat up some Olive Oil and cook the onions, garlic and bell pepper for about 3-4 minutes, then add the chili's and the jalapenos...cook for another minute (meanwhile chop up the chicken breasts). Add the tomatoes and the chopped up chicken, as well as the black beans and/or corn if you are using. At this point, I dump my enchilada sauce into a large bowl with about a cup of salsa (I like it that way - you don't have to add the salsa if you are a wuss), mix it around and add 4-5 spoonfuls to the chicken mixture. I also add some taco seasoning to the mix because I like my filling to be really flavorful, and the taco seasoning in the packets (like Ortega) also have corn starch or something in them to thicken the mixture. You can skip this part or just use salt, pepper, chili powder, cumin, cilantro, etc. Finally, I like to add some lime juice to give it a little zing!

    Pour about 1/3 of the enchilada sauce mixture into the bottom of a glass baking dish (I use this lasagna pan Steve bought me, because it has a lid so I can just put the leftovers directly into the fridge), fill your tortillas with the chicken mixture, put them in the pan seam side down, then pour the rest of the enchilada sauce on top. Top with the grated cheddar cheese and pop into a 350 degree oven for about 25 - 35 minutes, or until the middle is hot and the cheese is melty and bubbly. Top with whatever garnish you want! I was lazy so I just did sour cream and lettuce last night, but cilantro is ALWAYS worth using.

    Please note: you could substitute beef, pork, or just make these vegetarian (but make sure to use the black beans if that is the case, for protein). Also, if you have left over meat mixture, throw it in a plastic bag and put it in the freezer...this makes DELICIOUS nacho topping!

    If you want to make the Difficult Chicken Enchiladas, cook the whole chicken like I directed above, season it with your own spices instead of using a taco packet, and make this homemade enchilada sauce. It is more authentic than the canned stuff, and even though it is very different, it turns out really well. Note that the quality of the chili powder matters, if you can't find the kind that she recommends.

    Rockin Robin's Raving Enchilada Sauce:
    • 2 cups chicken broth
    • 4 Tbs Gebhardt Chili Powder
    • 1 tsp. ground cumin
    • 2 heaping tsp. garlic powder (with no salt added)
    • 3/4 tsp. salt
    • 1 pinch ground cinnamon (less than 1/16 tsp.)
    • 1/3 tsp. sugar
    • 5 Tbs. cold water
    • 5 Tbs. white flour
    Directions:In a 2 quart sauce pan add the chicken broth, chili powder, garlic powder, cumin, salt, cinnamon and sugar (the sugar is a little secret to eliminate any bitter taste from the chili powder).
    Use a whisk to mix everything well. Heat to a boil, reduce heat to a low boil and cook for 3 minutes.
    Whisk frequently to make sure all spices dissolve. This is important for flavor and a nice smooth sauce.
    While the sauce is on a slow simmer/boil, add 5 tablespoons of cold water in a small bowl.
    With another whisk mix 1 tablespoon at a time of flour. Whisk vigorously to avoid lumps. If you have lumps here, you will definitely have lumps in your sauce.
    After 3 minutes of cooking sauce, turn the heat up to high. Very slowly, pour the flour mixture into the boiling sauce. Here you must whisk the sauce vigorously while adding the flour to avoid lumps.
    After all the flour is added, continue to whisk for one minute. You can turn the heat down to medium during this time. Just make sure the sauce is boiling.
    Turn off the heat, this enchilada sauce recipe is done.