December 30, 2010

HAPPY NEW YEAR!!!

Mmmmmm...I love New Years Eve.

Anything that has to do with eating tasty treats and drinking champagne can't be bad, right?

I've got a double whammy this week - tonight I am hosting a get-together for my friend Tara, who is visiting from LA.

And then tomorrow I am hosting New Year's Eve dinner.

I haven't even thought about what I am going to cook for Friday night yet...I believe that my brother is bringing a venison tenderloin to cook on the grill, and then there was some talk about crab legs...and I've been craving risotto...

But right now I need to focus on tonight's party.

It should be a pretty laid back, everyone-bring-an-appetizer-to-share type of evening.

I am making my Deviled Eggs (with a kick!), and Buffalo Chicken Dip. Obviously my pledge to eat healthy(er) is not working out so well.

In my defense I wanted to make dishes with some protein, since there won't be a proper dinner.

Er...yeah...that's it!

Plus I have been craving Buffalo Chicken Dip for months. 

I'll try to take some pics and put a post up about it next week.

Until then - have a SAFE and HAPPY holiday weekend.

If you are looking for something to make for your NYE party, check out the categories to your left.

I am still working on getting the printable recipe link on all the food posts, but I probably have 50% done (see the very bottom of each post and click on "Printable Recipe")...here are a few of my favorites that I would recommend:

In charge of the appetizer? Deviled Eggs and Buffalo Chicken Dip just not your thing?

How about:


or - if you can get your hands on some tasty tomatoes - this delicious Tomato and Basil Bruschetta!

Need a main course?

How about this elegant and delicious Chicken Parmigiana?


Feeding a crowd or on a budget?

Try this sweet and savory (and easy!) Pulled BBQ Pork with Creamy Coleslaw!


Or, why not have a FIESTA with my Spicy Shredded Chicken stuffed inside of a Tostada or Enchiladas?


Browse through the categories - there is something for everyone!

Here's to a very happy and healthy 2011!

Cheers!

xoxoxoxo

~Lindsey

December 29, 2010

Asian Noodle Salad (adapted from the Pioneer Woman)

Yum.

I know that I've mentioned this salad a few times before (like here and here and here), but I'm not sure I've ever managed a totally coherent recipe post of my version with pictures.

This is delightful.

AND - it counts towards a "more healthy" recipe post!!!

YAY!!!!

This salad is a crowd pleaser - even for meat-and-potato types.

It is packed with veggies and you can customize it with whatever veggies you would like!

For instance - if you don't like cucumbers, leave them out!

If you have romaine lettuce on hand, add it in!

If you only can find red bell peppers, use 3 of those!

It is based on a recipe from The Pioneer Woman, and I believe hers is based on a recipe from Jamie Oliver.

Please try it soon - it is soooooo good!

It makes a lot (about 12 as a side dish), but could be cut in half.

I like to serve it as a main course too, with my recipe for Chicken Satay Skewers...the two go perfectly together!


Asian Noodle Salad - adapted from the Pioneer Woman (serves about 12 as a side dish)

Salad:
  • 1 lb linguine noodles (I've used both white or wheat and they are both good)
  • 1 bunch of cilantro, chopped
  • 1 large or 2 medium cucumbers, sliced
  • 3 bell peppers (for maximum color use red, orange and yellow)
  • 1 (14 oz) bag of shredded coleslaw mix
  • 1/2 bag of baby spinach
  • 1 bag of bean sprouts
  • 1 can of halved cashews
Dressing:
  • 6 tablespoons olive oil
  • 3 tablespoons toasted sesame oil
  • 8 tablespoons reduced sodium soy sauce
  • 1/3 cup of brown sugar
  • 2 fresh jalapenos, minced
  • the juice of one whole lime (or more to taste)
  • 3 tablespoons fresh minced ginger
  • 3 cloves of garlic
Combine all dressing ingredients in a mason jar with a lid. Shake enthusiastically until emulsified (meaning the oil is mixed in with the soy). Store in fridge for at least 2 hours before using (if possible), shaking occasionally.

Cook linguine noodles per package directions...let cool or run under cold water until cool. Place in a very large bowl. Add remaining salad ingredients except for the cashews. Shake dressing well and pour over all. Mix salad well.

Toast cashews in a shallow pan over medium heat. Top salad with cashews, serve immediately.

Leftovers may be refrigerated for about two days, but note that vegetables may start to wilt and cashews may lose their crunch (but don't worry - it will still taste good!).

Enjoy!

Printable Recipe

December 28, 2010

Christmas 2010

Can you believe how fast I got these pictures up?!

It's a Christmas miracle!!!!

Thanks Steven.

These are just pictures from his camera, because I haven't seen the pics that my mom or my uncle Joey took.

Anyway, here are some pictures from my family's celebration. We are waiting to do Christmas with the kids until they get back from Hawaii.


Here are a couple of the Christmas tree at my parents' house on Christmas Eve. Steve was playing with the light and shutter speed.


Here are a couple of pictures of my dad's side of the family...from left to right:
Cal, Lyndi, Georgia, Steve, me, my dad, my uncle Kirk (the tall one in the back), my mom, my uncle Joey.

 And no Christmas post would be complete without pictures of our beloved dogs, right? Unfortunately Steve didn't get any good pictures of Logan...which is a shame because he is a gorgeous monster of a dog (112 pounds).
How cute is Tilly? As Lyndi pointed out, she looks like she could be the daughter of Aly and Kempton. You know, if they weren't COUSINS and all that. And if they weren't all fixed. And if Kempton wasn't from North Carolina, Aly wasn't from Montana, and Tilly wasn't from Washington.
Aly and Tilly napping under the table.

We kept the dogs separate for most of the evening, but by the end we just decided to give up and see how it went with Grandpa Kempton in the mix. Over all it went really well! Logan and Aly seemed to almost know that they needed to be gentle with Kempton, and they pretty much left him alone. Tilly is only 6 months and a little crazier than the others, but she did really good too. Kempton did try to hump her a couple of times, and there were a couple of times that I may have come close to having a heart attack...but everything worked out fine.

And now for the food...

My dad made a delicious pork tenderloin on the charcoal grill, and served it with a yummy brown sauce. The marinade recipe that he used was fantastic - I'll see if I can get it from him to share.

My aunt Georgia made this gorgeous wild rice pilaf.

I made PW's Asian noodle salad (recipe post to come).


And my mom made two brand new recipes that we hadn't tried before. The top one is a squash au gratin with spinach, and the second is a bacon, apple and leek bread pudding. The bread pudding was amazing. A total keeper. I have to get that recipe.

Yum.

What a lucky girl I am to have such a totally rad family.

And to have them all be good cooks, on top of it! 

Thanks everyone!

Love you!

December 27, 2010

How to Roast Garlic (and other random thoughts)

Happy Monday!

I hope that everyone had a wonderful weekend...and for my friends that celebrate Christmas - a wonderful and Merry Christmas!

Santa was very good to me this year, and I was fortunate enough to spend the weekend with my family.

I ate (and drank) waaaaaay too much.

I'll post pictures later (blame Steve). 

So...I was thinking that I might need to scale back on the heavy comfort foods for a little while.

Like, forever.

Or at least for a couple days (New Years Eve, anyone?).

And another thing that I need to do is start working on posting pictures for the recipes on here that don't have any; as well as rewriting some of my more confusing recipe posts.

These are things that I will be working on over the next few months, so bear with me if there are less "new" recipes posted and more re-runs.

I'll try to slip in a "healthy" recipe here or there too.

I use the term loosely.

Here's one now!

Garlic is really good for you, and roasting garlic mellows out the flavor as well as making it easy to spread.

Also - it may or may not keep vampires away. 

Use this for pasta sauces, soups, salad dressings...or just spread some on a loaf of good crusty bread!


How to Roast Garlic
  • 1 head of garlic
  • 1 tablespoon olive oil
  • 1 sheet of aluminum foil
Preheat the oven to 375 degrees.

Peel as much of the papery outside off of the garlic as possible, while still keeping a layer on the cloves, and the cloves attached by the root.

Slice off the top of the head of garlic, exposing the cloves.

Drizzle the olive oil over the exposed cloves, and wrap the entire head in the aluminum foil (you could also use a garlic cooker if you have one).

Bake for 45 - 60 minutes, until the cloves are soft throughout.

Let cool and then squeeze the roasted garlic "paste" out of the head and use.

Enjoy!

Printable Recipe

December 22, 2010

Cone of Shame

Sorry for the grainy pic - I took it last night on my phone.

As bad as I feel when he gives me this look...I still can't help but chuckle when I see this picture.

Pathetic.

It's a crazy busy week for me this week so I don't know if I will get around to posting another recipe, but I wanted to give you an update on Kempton and wish you a very Happy Holiday(s)!

Kempton is doing really well.

His surgeon and his therapist agree that his range of motion is excellent, and he has already lost 4 pounds (he is suppose to lose 7) - quite the feat considering his is leash-bound and until Friday, wasn't allowed any exercise except to go to the bathroom.

He won't stop licking his incision (hence the cone of shame), no matter what I try. He now has to wear his cone all day when I am gone, and for most of the night. By keeping the cone on, about 2/3 of the incision has healed, but there is about 2 inches on top that hasn't closed yet. I am hoping that it heals by Christmas so that I don't have to embarrass Kempton by making him wear his cone in front of the other dogs.

We are approaching the 4th week since his surgery, and weeks 4 - 6 are a very delicate time because the sutures are dissolving and the knee is very unstable. We are working hard to rebuild the muscle in his left leg, but it is still about 5 centimeters smaller than his right.

Hopefully we can get through Christmas with 3 other dogs (2 2 year olds and one puppy) without re-injuring his knee, which (as the surgeone said) would be "catastrophic". It will be interesting to say the least, and I am anticipating a very stressful weekend for myself.

Hopefully someone bought me wine for Christmas.

I'll update you all after the holidays - please send us positive thoughts!

I also wanted to take a moment to say "Thank You!" to everyone who is reading this. I hope that you all have a wonderful holiday season and I will catch up with you next week at the latest!

Love,
Lindsey

December 21, 2010

Meaty Lasagna

The answer to your question is yes.

I do weigh 6,000 pounds due to all of the hearty comfort food that I have been consuming.

I promise that after the new year, I will try to post something healthy.

There is no point in even pretending like I am going to eat healthy before then.

Please note: for this recipe I used uncooked lasagna noodles. If you are going to cook your noodles first, do not use cottage cheese. Use ricotta cheese because it is less runny (though quite a bit higher in calories...not that we are counting).

Having homemade (or store-bought - I won't tell) marinara sauce on hand makes this recipe a cinch to throw together.

Yum.

It doesn't get much more comforting than lasagna.


Meaty Lasagna (serves 8**)
  • 1 lb lean ground beef
  • 1 lb Italian sausage (spicy or mild, whatever your preference)
  • 8 cups marinara sauce
  • 1/2 large yellow onion, diced
  • 4 cloves of garlic, minced
  • 24 oz cottage cheese
  • 1 cup grated Parmesan cheese
  • 1 large egg
  • 1 lb grate mozzarella cheese
  • 1 lb uncooked lasagna noodles (you probably won't use the whole box...save the rest for next time!)
Preheat the oven to 350 degrees.

Brown beef and sausage in a large saucepan over medium heat. Throw the onions and garlic in the with the beef for the last few minutes of cooking. Drain grease.

Add marinara sauce to saucepan and stir to combine. Heat through.

Combine cottage cheese, Parmesan cheese and egg in a large bowl.

In a large lasagna pan, put enough meat sauce on the bottom of the pan to cover it (about 2 cups). Place uncooked noodles in a single layer on top of sauce. On top of noodles, spread 1/2 of the cottage cheese mixture and 2 cups of mozzarella cheese. Place about 2 cups of meat sauce on top of mozzarella cheese, then another layer of noodles. Put remaining cottage cheese mixture on top of noodles, followed by remaining meat sauce and then top with remaining mozzarella cheese (and additional Parmesan cheese if desired)*.

Cover with aluminum foil, place on top of a baking sheet (to catch drips) and bake for 45 minutes.

Remove aluminum foil and continue to cook until cheese is bubbly and brown.

Remove from oven and let sit for 10 - 15 minutes.

Enjoy!

*If you have a deeper lasagna pan (or if you don't use any meat), you could probably do a third layer. Mine was almost overflowing so I could only do 2 layers.
**This recipe is easy to cut in half if you want to use an 8" x 8" baking dish instead of a 9" x 13". Cut all ingredients in half except for the egg - you can still use a whole egg (plus, how do you cut an egg in half? Don't answer that.).

Printable Recipe

December 16, 2010

Good News!

I have a couple bits of good news for you all on this gorgeous Thursday!

And by gorgeous, I mean that the temperature is above zero.

The first bit of info is on a personal note...

A judge signed the stipulation granting me the ownership of my house this week!

Translation: I pay Jim out half the amount of equity and his name comes off the title of the house!

So my little cottage is mine all mine - to sell, fix up or add on to!

For those of you in the area, a saging housewarming party is in the making...but it probably won't occur until after the holidays!

The second bit of good news impacts most of you a little more, because it is about the blog...

Thanks to the help of the lovely and talented Dara of Cookin' Canuck, I will soon be including a link at the bottom of each of my recipes for a printable recipe!

Dara was kind enough to walk me through how to do this, so over the next couple of weeks I will be working tirelessly (or in between shopping, wrapping and eating) to add the link to the bottom of all of my existing recipes!

I hope this makes it easier for you to try and share your favorite recipes.

On another note, tomorrow is Steven's birthday and we have a collection of festivities to attend to over the weekend, so you may not hear from me again until Monday.

Boo! Wah! Hmpf. Snort.

Don't worry - I will try to cook up something delicious this weekend so that I have some good stuff to share with you next week!

In the meantime, stay warm and have a fabulous weekend!

December 15, 2010

Hot Jalapeno Popper Dip

Monday after work Marisa and Erin came over to have a little "Happy Hour" get together and so they could meet my sister-in-law-to-be, Lyndi (who is currently staying with me).

I had been eying (eyeing?) this recipe on Tasty Kitchen that I came across for Hot Jalapeno Popper Dip, and I decided that this was the perfect time to try it out.


Yum.

It was really good - it was creamy with just the right amount of heat, and it tasted very similar to a jalapeno popper (which was the goal).

The recipe was for 6 or more people, and the 4 of us almost ate the whole thing.

Here is the recipe...I only made a couple of slight adjustments (which I noted below). This is perfect for your next party!

Hot Jalapeno Popper Dip (serves 6 - 8) by babskitchen on Tasty Kitchen
  • 2 whole (8 Oz. Each) Pkgs. Cream Cheese, Softened
  • ½ cups Sour Cream
  • ½ cups Mayonnaise
  • 1 can (4 Oz.) Chopped Green Chilies, Drained I used fire-roasted
  • 5 whole Jalapeño Peppers, Seeded And Diced (leave In A Few Of The Seeds To Give Dish Some Extra Heat)
  • ½ cups Parmesan Cheese, Grated
  • ½ cups Panko (Japanese Bread Crumbs)

Preheat oven to 400ºF.

Stir together cream cheese, sour cream, and mayo in a large bowl until smooth. Stir in green chiles and jalapeños. I used a hand mixture to blend it all together once the cream cheese was soft.

Pour mixture into an oven safe serving dish and sprinkle with Parmesan cheese and panko crumbs. Bake, uncovered, for 15 minutes, then put under the broiler for 1 – 3 minutes to lightly brown the top.

Serve warm with tortilla chips, crackers or a crusty bread.

*Cut recipe in half for 6 or fewer people.

** I think putting a layer of grated sharp cheddar cheese (or mixing a half cup in with the mixture) would be delightful. I also think it could have used a 1/2 teaspoon or so of salt. 

Printable Recipe

December 14, 2010

Chicken Parmigiana

Yummy Yummy Yummy.

Chicken Parmigiana is one of my favorite dishes of all time.

It's a bit labor intensive...especially if you make your own marinara sauce (which I did), but totally worth it.

It's comfort food that is fancy enough for company.


Come to mama.

Make this very soon.

If you have leftovers, you could make it into a Chicken Parmigiana hoagie!

I didn't include a marinara sauce recipe below because I'm still tweaking it.

You can use your own favorite recipe, a jar of premade, or below are a couple of my tomato sauce recipes that would also work:

Roasted Tomato Sauce (this is yummy and probably the closest thing to my marinara sauce that I have on the blog)

Spaghetti and Meatballs...from scratch (this is a little more labor intensive, but a yummy recipe to make for someone that you love)

Also - this recipe will give you a generous amount of coating for the chicken breasts...you could easily make 6 breasts with this amount of egg wash, flour and bread crumbs. Or you could cut the recipe in half if you were only making 2 or 3 breasts.

Chicken Parmigiana (serves 4)
  • 4 boneless, skinless chicken breasts
  • 2 cups of flour
  • 1 tablespoon of salt
  • 1 tablespoon fresh cracked pepper
  • 1 tablespoon garlic powder
  • 2 eggs, beaten with two tablespoons of water
  • 1 cup of crushed croutons (I used cheese and garlic croutons, Italian would also work well), you could also use Italian style breadcrumbs, but the croutons have a wonderful texture
  • 2 cups Panko breadcrumbs
  • 6 cups of your favorite marinara sauce (see above recipes)
  • 2 tablespoons Italian seasoning (thyme, oregano, etc.)
  • 1 tablespoon dried basil
  • 1 cup olive oil
  • 1 pound spaghetti or angel hair pasta
  • 1 cup Parmesan cheese, grated
Place chicken breasts in a large zip-top bag. Using the flat side of a meat mallet, pound breasts until they are thin. This will help them cook uniformly (is uniformly a word?). 

In one bowl (I use a pasta bowl) or plate, combine flour, salt, pepper and garlic powder .

In a second bowl/plate, put eggwash (beaten eggs plus water).

In a third bowl/plate, combine crushed croutons, Panko breadcrumbs, Italian seasoning and basil.

Dip each chicken breast first in the flour mixture, then in the eggwash, then in the breadcrumb mixture, making sure to coat both sides. Set aside.

Preheat oven to 450 degrees.

Warm your marinara sauce on the stovetop in an oven-safe pot or dutch oven (I used my Le Creuset).  Make sure that the pot is large enough to fit all of the chicken breasts because this will be the vessel that you will be using to finish the dish.

Cook pasta according to package directions.

Heat olive oil in a large frying pan to medium heat. Add the coated chicken breasts to the hot oil (working in batches if necessary), and cook until the bottom of the breast is starting to get nice and brown. Flip over and repeat on the other side.

Place browned chicken breasts on top of the marinara sauce in an oven-safe pan, sprinkle each breast generously with Parmesan cheese. Place the dish uncovered into the oven and bake for 10 minutes or until sauce is hot and cheese is melted and bubbly.

Plate by adding some noodles, topped with a chicken breast and some extra sauce. Finish with more grated Parmesan cheese, if desired.

Enjoy!

Printable Recipe

December 13, 2010

It must be Monday...

Because I'm tired and I want to go to sleep at my desk.

Because I have a recipe to post for Chicken Parmigiana, but I can't get my brain to work in the right ways in order to get it done.

Because I made Chicken Wild Rice soup last night and forgot to pull out my camera. (Though I have leftovers that I can re-heat and snap a picture of...maybe if I think of it.)

Because Steve and the kids came over last night to decorate my Christmas tree and I didn't take one picture of the cuteness.

Because I should go home and exercise, plan meals for the week and make a grocery list...but instead I am going to go out for Happy Hour with a couple of my girlfriends.

Because I am a rockstar.

Have a lovely Monday!

December 7, 2010

Finger Lickin' BBQ Chicken and Kempton Update

Happy Tuesday droogies!

Is it Thursday yet?

My mom and dad are coming to town on Friday and staying with me Friday night, then Lyndi is coming on Sunday and staying with me for a little while (until she finds a place)! My hide-a-bed is going to be busy!

I'm having a hard time stringing together coherent thoughts today, but I wanted to give ya'll an update on Kempton.

I brought him home from the vet on Friday, and I'm pretty sure they were ready to be rid of him. The ladies at the front desk said (kindly) that he had been whining and howling all day. The surgeon said that he was making good progress - already "toe-touching" and allowing them to do some range-of-motion exercises.

Steve and I loaded him up in the car and brought him home. Steve had to go back to work, and by the time he got home I had 2 bottles of wine down, er...already started drinking, um was ready to pull my hair out.

The ladies at the vet were right.

Incessant whining.

Whining like I have never heard before.

I literally was waiting for him to go hoarse.

It never happened.

It was the most frustrating thing about this whole experience...it didn't matter what I did.

Hug you? No. Pet you? No. Ignore you? No. Feed you? No. Ice your leg? Warm pack it? Leave it alone? Take you out to pee? Make you rest? No no no no no.

He had his pain patch on still, as well as taking an anti-inflammatory, glucosamine and anti-biotics. There wasn't anything else I could do for him. I laid down on the floor next to him and snuggled him and talked to him...he just whined the entire time.

Thankfully, by Sunday he had calmed down and given into the fact that he was exhausted (so was I).

Now his personality is pretty much back to normal. He isn't quite as fiesty, but that is to be expected (and it's probably good because he needs to take it easy).

He and I are meeting with his physical therapist tomorrow after work to get more exercises and massage techniques that will help get his range of motion back and also help with his hips.

The only issue that we are having is with his cone.

You know, that ridiculous collar that looks like a lampshade?

Yes, he is suppose to wear one of those when we are not home.

He is an escape artist.

It doesn't matter what we do or how tight we put it on, he can get out of it.

He thrashes around and plows into stuff (we sat downstairs and listened one day), and I am worried it is going to do more harm than good. So I've been leaving it off, but he has been licking his incision and not allowing it to heal. I am waiting for the surgeon to call me back and give me some suggestions.

I have some pictures, but I haven't had a chance to upload them yet.

In the meantime, I am going to post my recipe for BBQ chicken on the grill (charcoal grill).

I know grilling season is over, but Steve has a hard time letting go so we continue to shovel the deck off and use the grill during the milder days of winter.

The real gem here is the method...you can use whatever rub and/or sauce you would like.

The thing you need to remember is that bbq sauce is high in sugar, which burns at a relatively low temperature...so don't add your sauce until later in the process. That is where a rub comes in handy...it imparts flavor while the chicken is cooking, but doesn't burn and get all bitter.

Check it out - and try this soon (as soon as you can chisel your grill out of the snowbank).


Finger Lickin' BBQ Chicken...On The Charcoal Grill (serves 4)

  • 6 chicken breasts (I use the bone-in kind for this...boneless, skinless dries out too fast)
  • 3 tablespoons BBQ rub (I use Penzey's BBQ 3000, but you could also make your own)
  • 3 cups of BBQ sauce (plus extra sauce stored separately to serve); you can find a recipe for my bbq sauce here
Pat your chicken breasts dry with paper towels, and then liberally add bbq rub and massage into chicken. Set aside.

Start your grill, and when the coals are hot, move all of them over to one side. This makes one "hot" side and one "cold" side (don't worry, the cold side isn't actually cold...just cooler than the hot side).

Place the chicken on the cold side of the grill, skin side down, and cook covered until skin starts to brown (about 15 - 20 minutes)*.

Flip chicken and move it to the middle of the grill. Start flipping and basting with bbq sauce every five minutes for 20 minutes...the chicken should start to get nice and sticky.

Move chicken to hot part of the grill, basting and flipping until chicken becomes crusted on the outside, and a meat thermometer inserted into breast reads 165.

Remove from heat and let rest for 5 - 10 minutes. Serve with extra sauce.

Enjoy!

* You might need to do this in batches if you have a small charcoal grill

Printable Recipe

December 6, 2010

Pasta with Italian Sausage and Roasted Red Pepper Tomato Sauce

Yum. I posted this recipe last spring (which is a similar recipe), in anticipation of a long and plentiful tomato season.

It is adapted from a recipe that my "Auntie" Gale made for me when I was living in North Carolina and she came to visit.

That was 8 years ago, and I have been making different adaptations of it regularly since.

Kempton was just a tiny baby then. 

This time of year, I am either using frozen tomatoes out of my summer stash, or the canned/boxed kind, but you could also use fresh.

To be honest, if you really needed a fast dinner you could buy a jar of pre-made Roasted Red Pepper Tomato Sauce.

But I would recommend making your own - it tastes better and you will feel better serving it your family.

Plus, what would I do to relieve stress if I wasn't making complicated recipes from scratch on weeknights?

So you're support of this blog is actually contributing to the improvement of my mental health!

Huh?

Anyway...

For my recipe I also used Steve's family's homemade Italian sausage, but you can use store bought bulk or links.

If you don't know how to roast peppers, check out my previous post for a step-by-step!

One other thing - you could add mushrooms if you had them on hand. Just saute them while you are sauteing the onions and garlic! 

Try this soon - you'll love it!


Pasta with Italian Sausage and Roasted Red Pepper Tomato Sauce (serves 8)
  • 1 lb penne pasta
  • 1 lb hot Italian sausage
  • 52 ounces of undrained diced tomatoes (I used 2 26 oz boxes of Pomi tomatoes)
  • 2 roasted red peppers (see previous post for step-by-step), peeled and diced
  • 1/2 yellow onion, diced
  • 4 cloves of garlic, minced
  • 4 oz sun-dried tomatoes packed in oil, drained and chopped
  • 2 tablespoons dried basil
  • 1/2 - 1 teaspoon crushed red pepper (less if you don't like spicy)
  • 1 teaspoon kosher salt (or to taste)
  • 1 teaspoon cracked black pepper
  • 1/2 teaspoon white sugar (or to taste)
  • 4 oz crumbled feta cheese (you could sub goat or Parmesan cheese), plus more for serving
Heat a large skillet or dutch oven over medium high heat. Add Italian sausage, onion and garlic. Cook until sausage is brown and onion is tender.

Add tomatoes, roasted red peppers, sun-dried tomatoes, basil, red pepper, salt, pepper and sugar and bring to a low boil.

Reduce heat and simmer sauce for 30 minutes or until it is your desired consistency, adding salt, sugar and red pepper to taste.

While sauce is cooking, cook pasta according to package directions.

Toss cooked noodles with sauce (adding half at a time - you want to make sure you have plenty of sauce), add feta cheese and toss to combine.

Serve with extra feta

Enjoy!

Printable Recipe

    December 3, 2010

    How to Roast Bell Peppers

    This is a prequel to my next recipe post, which is a delicious pasta dish that uses roasted red peppers and tomatoes as the base for the sauce.

    Before I realized how easy it was to make them at home, I would buy bottled roasted red peppers at the store.

    Now I make my own at home all the time.

    Not only is it easy and cheap, but it eliminates the additives and preservatives that you find in the stuff in the jar.

    Here is the step by step:

    1. Wash peppers and place them on a baking sheet and into the oven.

    2. Turn on the broiler (mine has a high/low setting, and I use the high setting), and crack the oven door.

    3. Keep a close eye on these babies - the temp is very hot! When the side that is facing up begins to blacken, turn peppers over to blacken the next side. They will start to look like this:


    4. Continue turning peppers until all sides are blackened.

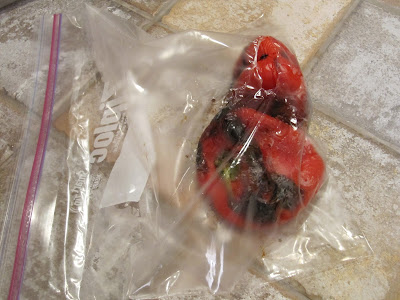
    5. Remove from heat and immediately place in a bowl covered tightly with plastic wrap. I used a zip top bag this time, and I wouldn't recommend it...those peppers are HOT and can easily melt a hole through the plastic.


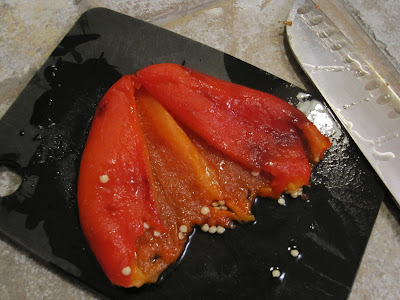
    6. Once peppers are cool, removed them from bowl and peel the skin (it should come off easily).

    7. Remove the top of the pepper, and the seeds.


    8. Slice/dice and use as desired. If you want to roast peppers in bulk, you can freeze them between sheets of wax paper (these should last for several months), or cover them in olive oil and refrigerate them (should keep for a couple of weeks).

    Use the peppers in sauces (recipe coming soon), salads, on sandwiches, or puree and use in dressings or hummus. Yum!

    Printable Recipe

    December 2, 2010

    Macaroni and Cheese A La Steph! (Kid Friendly!)

    It's been a while since I posted a recipe.

    Things have been busy and I have been preoccupied, but don't worry!

    When I stress, I cook.

    When I cook, I eat.

    When I eat, I feel better!

    I just haven't got around to posting much...

    To break the cycle, I am going to tell you about a recipe that I adapted from a recipe that my sweet soul friend Stephanie gave me.

    Macaroni and Cheese.

    Who doesn't love it?

    She gave me this "lightened up" version almost a year ago, and I have to admit...I was a little scared to try it.

    One of the main ingredients is...light mayonnaise.

    Now don't hate or close your browser window - I know what you are thinking.

    Mayo? And not just any mayo, but light mayo?

    Trust me, it scared me off for a long time.

    But last week, I was craving hearty comfort food (preferably without the love handles), and this came to mind.

    So I dug it out.

    When I bought the ingredients, I was planning on it just being me for dinner.

    But then Steve called and said the kids would like to come by (it's the excuse he uses when he wants to see me but doesn't want to admit it...blames it on the kids...hee hee), and I figured I would use them all as guinea pigs!

    That's how I roll.

    I was really impressed.

    The kids loved it.

    Even Andy.

    The picky one.

    And then I kicked myself for not trusting my Stephanie's judgment sooner.

    A lower fat mac and cheese that's kid friendly too?

    Brilliant!

    Don't get me wrong, this isn't necessarily healthy.

    Very few dishes that involve 3 cups of cheese and a pound of pasta are healthy.

    But it probably has less calories than most mac and cheese recipes (or at least that is what I am choosing to believe).

    I changed a couple of things (surprise!), and I am going to post the recipe that I made...but I will put some tips/variations at the end for you so you can make it your own, ok?

    Ok!

    Macaroni and Cheese A La Steph (serves 8)
    • 1 lb of your favorite short pasta (I used rotini but you could use elbow macaroni or other)
    • 1 can of cream of chicken soup
    • 1 cup of light mayo
    • 3 cups of grated sharp cheddar cheese
    • 1/2 cup of milk to thin
    • salt and pepper to taste
    Preheat oven to 350 degrees.

    Cook noodles al dente, drain. Add remaining ingredients and stir and completely combined, adding salt and pepper to taste as necessary.

    Transfer to an oven safe casserole dish or pan.

    Cook uncovered for 15 - 20 minutes or until heated through.

    Enjoy!

    * To really make it light, you could use low fat cream of chicken soup and reduced fat cheese. Be careful though, as this might change the texture
    * Steph said she usually crushes up whole wheat crackers and sprinkles them on the top...you could also use panko or Italian bread crumbs. I did none of these, because Andy likes things very plain.
    * Steph also mentioned that you could add cooked chorizo sausage, bacon, or Italian sausage to this...I have not tried that yet (again, for fear that Andy wouldn't eat it).
    * You could also add cooked broccoli, asparagus, spinach, cauliflower, or anything else that would contribute to your illusion of healthiness.

    Thank you for the recipe, Steph! I will never doubt you again. xo

    Printable Recipe

    December 1, 2010

    Kempton's Surgery

    Just wanted to update everyone that Kempton's surgery went well! He got sick before and so now he is on meds for that too, but the surgeon said she was pleased with the surgery. He is just starting to wake up now.

    I am allowed to go and see him, but the surgeon advised against it...she said that it will most likely make him depressed after I leave, so if I can stand not seeing him for a couple of days that would be best. I want to do what is best for him - and I know that what she is saying is true...I have had friends and family tell me about how Kempton was lethargic, whiny and pouty when I am gone on vacation, etc. So I will try to stay away.

    She is going to call tomorrow with an update though.

    Thanks for all of your thoughts, prayers, comments, emails, phone calls and text messages - I appreciate it very much!