
 Posts
Posts


Because I'm tired and I want to go to sleep at my desk.
Because I have a recipe to post for Chicken Parmigiana, but I can't get my brain to work in the right ways in order to get it done.
Because I made Chicken Wild Rice soup last night and forgot to pull out my camera. (Though I have leftovers that I can re-heat and snap a picture of...maybe if I think of it.)
Because Steve and the kids came over last night to decorate my Christmas tree and I didn't take one picture of the cuteness.
Because I should go home and exercise, plan meals for the week and make a grocery list...but instead I am going to go out for Happy Hour with a couple of my girlfriends.
Because I am a rockstar.
Have a lovely Monday!
December 13, 2010


December 8, 2010


December 7, 2010
Finger Lickin' BBQ Chicken and Kempton Update
Happy Tuesday droogies!
Is it Thursday yet?
My mom and dad are coming to town on Friday and staying with me Friday night, then Lyndi is coming on Sunday and staying with me for a little while (until she finds a place)! My hide-a-bed is going to be busy!
I'm having a hard time stringing together coherent thoughts today, but I wanted to give ya'll an update on Kempton.
I brought him home from the vet on Friday, and I'm pretty sure they were ready to be rid of him. The ladies at the front desk said (kindly) that he had been whining and howling all day. The surgeon said that he was making good progress - already "toe-touching" and allowing them to do some range-of-motion exercises.
Steve and I loaded him up in the car and brought him home. Steve had to go back to work, and by the time he got home Ihad 2 bottles of wine down, er...already started drinking, um was ready to pull my hair out.
The ladies at the vet were right.
Incessant whining.
Whining like I have never heard before.
I literally was waiting for him to go hoarse.
It never happened.
It was the most frustrating thing about this whole experience...it didn't matter what I did.
Hug you? No. Pet you? No. Ignore you? No. Feed you? No. Ice your leg? Warm pack it? Leave it alone? Take you out to pee? Make you rest? No no no no no.
He had his pain patch on still, as well as taking an anti-inflammatory, glucosamine and anti-biotics. There wasn't anything else I could do for him. I laid down on the floor next to him and snuggled him and talked to him...he just whined the entire time.
Thankfully, by Sunday he had calmed down and given into the fact that he was exhausted (so was I).
Now his personality is pretty much back to normal. He isn't quite as fiesty, but that is to be expected (and it's probably good because he needs to take it easy).
He and I are meeting with his physical therapist tomorrow after work to get more exercises and massage techniques that will help get his range of motion back and also help with his hips.
The only issue that we are having is with his cone.
You know, that ridiculous collar that looks like a lampshade?
Yes, he is suppose to wear one of those when we are not home.
He is an escape artist.
It doesn't matter what we do or how tight we put it on, he can get out of it.
He thrashes around and plows into stuff (we sat downstairs and listened one day), and I am worried it is going to do more harm than good. So I've been leaving it off, but he has been licking his incision and not allowing it to heal. I am waiting for the surgeon to call me back and give me some suggestions.
I have some pictures, but I haven't had a chance to upload them yet.
In the meantime, I am going to post my recipe for BBQ chicken on the grill (charcoal grill).
I know grilling season is over, but Steve has a hard time letting go so we continue to shovel the deck off and use the grill during the milder days of winter.
The real gem here is the method...you can use whatever rub and/or sauce you would like.
The thing you need to remember is that bbq sauce is high in sugar, which burns at a relatively low temperature...so don't add your sauce until later in the process. That is where a rub comes in handy...it imparts flavor while the chicken is cooking, but doesn't burn and get all bitter.
Check it out - and try this soon (as soon as you can chisel your grill out of the snowbank).

Finger Lickin' BBQ Chicken...On The Charcoal Grill (serves 4)
Start your grill, and when the coals are hot, move all of them over to one side. This makes one "hot" side and one "cold" side (don't worry, the cold side isn't actually cold...just cooler than the hot side).
Place the chicken on the cold side of the grill, skin side down, and cook covered until skin starts to brown (about 15 - 20 minutes)*.
Flip chicken and move it to the middle of the grill. Start flipping and basting with bbq sauce every five minutes for 20 minutes...the chicken should start to get nice and sticky.
Move chicken to hot part of the grill, basting and flipping until chicken becomes crusted on the outside, and a meat thermometer inserted into breast reads 165.
Remove from heat and let rest for 5 - 10 minutes. Serve with extra sauce.
Enjoy!
* You might need to do this in batches if you have a small charcoal grill
Printable Recipe
Is it Thursday yet?
My mom and dad are coming to town on Friday and staying with me Friday night, then Lyndi is coming on Sunday and staying with me for a little while (until she finds a place)! My hide-a-bed is going to be busy!
I'm having a hard time stringing together coherent thoughts today, but I wanted to give ya'll an update on Kempton.
I brought him home from the vet on Friday, and I'm pretty sure they were ready to be rid of him. The ladies at the front desk said (kindly) that he had been whining and howling all day. The surgeon said that he was making good progress - already "toe-touching" and allowing them to do some range-of-motion exercises.
Steve and I loaded him up in the car and brought him home. Steve had to go back to work, and by the time he got home I
The ladies at the vet were right.
Incessant whining.
Whining like I have never heard before.
I literally was waiting for him to go hoarse.
It never happened.
It was the most frustrating thing about this whole experience...it didn't matter what I did.
Hug you? No. Pet you? No. Ignore you? No. Feed you? No. Ice your leg? Warm pack it? Leave it alone? Take you out to pee? Make you rest? No no no no no.
He had his pain patch on still, as well as taking an anti-inflammatory, glucosamine and anti-biotics. There wasn't anything else I could do for him. I laid down on the floor next to him and snuggled him and talked to him...he just whined the entire time.
Thankfully, by Sunday he had calmed down and given into the fact that he was exhausted (so was I).
Now his personality is pretty much back to normal. He isn't quite as fiesty, but that is to be expected (and it's probably good because he needs to take it easy).
He and I are meeting with his physical therapist tomorrow after work to get more exercises and massage techniques that will help get his range of motion back and also help with his hips.
The only issue that we are having is with his cone.
You know, that ridiculous collar that looks like a lampshade?
Yes, he is suppose to wear one of those when we are not home.
He is an escape artist.
It doesn't matter what we do or how tight we put it on, he can get out of it.
He thrashes around and plows into stuff (we sat downstairs and listened one day), and I am worried it is going to do more harm than good. So I've been leaving it off, but he has been licking his incision and not allowing it to heal. I am waiting for the surgeon to call me back and give me some suggestions.
I have some pictures, but I haven't had a chance to upload them yet.
In the meantime, I am going to post my recipe for BBQ chicken on the grill (charcoal grill).
I know grilling season is over, but Steve has a hard time letting go so we continue to shovel the deck off and use the grill during the milder days of winter.
The real gem here is the method...you can use whatever rub and/or sauce you would like.
The thing you need to remember is that bbq sauce is high in sugar, which burns at a relatively low temperature...so don't add your sauce until later in the process. That is where a rub comes in handy...it imparts flavor while the chicken is cooking, but doesn't burn and get all bitter.
Check it out - and try this soon (as soon as you can chisel your grill out of the snowbank).

Finger Lickin' BBQ Chicken...On The Charcoal Grill (serves 4)
- 6 chicken breasts (I use the bone-in kind for this...boneless, skinless dries out too fast)
- 3 tablespoons BBQ rub (I use Penzey's BBQ 3000, but you could also make your own)
- 3 cups of BBQ sauce (plus extra sauce stored separately to serve); you can find a recipe for my bbq sauce here
Start your grill, and when the coals are hot, move all of them over to one side. This makes one "hot" side and one "cold" side (don't worry, the cold side isn't actually cold...just cooler than the hot side).
Place the chicken on the cold side of the grill, skin side down, and cook covered until skin starts to brown (about 15 - 20 minutes)*.
Flip chicken and move it to the middle of the grill. Start flipping and basting with bbq sauce every five minutes for 20 minutes...the chicken should start to get nice and sticky.
Move chicken to hot part of the grill, basting and flipping until chicken becomes crusted on the outside, and a meat thermometer inserted into breast reads 165.
Remove from heat and let rest for 5 - 10 minutes. Serve with extra sauce.
Enjoy!
* You might need to do this in batches if you have a small charcoal grill
Printable Recipe
December 6, 2010
Pasta with Italian Sausage and Roasted Red Pepper Tomato Sauce
Yum. I posted this recipe last spring (which is a similar recipe), in anticipation of a long and plentiful tomato season.
It is adapted from a recipe that my "Auntie" Gale made for me when I was living in North Carolina and she came to visit.
That was 8 years ago, and I have been making different adaptations of it regularly since.
Kempton was just a tiny baby then.
This time of year, I am either using frozen tomatoes out of my summer stash, or the canned/boxed kind, but you could also use fresh.
To be honest, if you really needed a fast dinner you could buy a jar of pre-made Roasted Red Pepper Tomato Sauce.
But I would recommend making your own - it tastes better and you will feel better serving it your family.
Plus, what would I do to relieve stress if I wasn't making complicated recipes from scratch on weeknights?
So you're support of this blog is actually contributing to the improvement of my mental health!
Huh?
Anyway...
For my recipe I also used Steve's family's homemade Italian sausage, but you can use store bought bulk or links.
If you don't know how to roast peppers, check out my previous post for a step-by-step!
One other thing - you could add mushrooms if you had them on hand. Just saute them while you are sauteing the onions and garlic!
Try this soon - you'll love it!

Pasta with Italian Sausage and Roasted Red Pepper Tomato Sauce (serves 8)
Add tomatoes, roasted red peppers, sun-dried tomatoes, basil, red pepper, salt, pepper and sugar and bring to a low boil.
Reduce heat and simmer sauce for 30 minutes or until it is your desired consistency, adding salt, sugar and red pepper to taste.
While sauce is cooking, cook pasta according to package directions.
Toss cooked noodles with sauce (adding half at a time - you want to make sure you have plenty of sauce), add feta cheese and toss to combine.
Serve with extra feta
Enjoy!
Printable Recipe
It is adapted from a recipe that my "Auntie" Gale made for me when I was living in North Carolina and she came to visit.
That was 8 years ago, and I have been making different adaptations of it regularly since.
Kempton was just a tiny baby then.
This time of year, I am either using frozen tomatoes out of my summer stash, or the canned/boxed kind, but you could also use fresh.
To be honest, if you really needed a fast dinner you could buy a jar of pre-made Roasted Red Pepper Tomato Sauce.
But I would recommend making your own - it tastes better and you will feel better serving it your family.
Plus, what would I do to relieve stress if I wasn't making complicated recipes from scratch on weeknights?
So you're support of this blog is actually contributing to the improvement of my mental health!
Huh?
Anyway...
For my recipe I also used Steve's family's homemade Italian sausage, but you can use store bought bulk or links.
If you don't know how to roast peppers, check out my previous post for a step-by-step!
One other thing - you could add mushrooms if you had them on hand. Just saute them while you are sauteing the onions and garlic!
Try this soon - you'll love it!

Pasta with Italian Sausage and Roasted Red Pepper Tomato Sauce (serves 8)
- 1 lb penne pasta
- 1 lb hot Italian sausage
- 52 ounces of undrained diced tomatoes (I used 2 26 oz boxes of Pomi tomatoes)
- 2 roasted red peppers (see previous post for step-by-step), peeled and diced
- 1/2 yellow onion, diced
- 4 cloves of garlic, minced
- 4 oz sun-dried tomatoes packed in oil, drained and chopped
- 2 tablespoons dried basil
- 1/2 - 1 teaspoon crushed red pepper (less if you don't like spicy)
- 1 teaspoon kosher salt (or to taste)
- 1 teaspoon cracked black pepper
- 1/2 teaspoon white sugar (or to taste)
- 4 oz crumbled feta cheese (you could sub goat or Parmesan cheese), plus more for serving
Add tomatoes, roasted red peppers, sun-dried tomatoes, basil, red pepper, salt, pepper and sugar and bring to a low boil.
Reduce heat and simmer sauce for 30 minutes or until it is your desired consistency, adding salt, sugar and red pepper to taste.
While sauce is cooking, cook pasta according to package directions.
Toss cooked noodles with sauce (adding half at a time - you want to make sure you have plenty of sauce), add feta cheese and toss to combine.
Serve with extra feta
Enjoy!
Printable Recipe
December 3, 2010
How to Roast Bell Peppers
This is a prequel to my next recipe post, which is a delicious pasta dish that uses roasted red peppers and tomatoes as the base for the sauce.
Before I realized how easy it was to make them at home, I would buy bottled roasted red peppers at the store.
Now I make my own at home all the time.
Not only is it easy and cheap, but it eliminates the additives and preservatives that you find in the stuff in the jar.
Here is the step by step:
1. Wash peppers and place them on a baking sheet and into the oven.
2. Turn on the broiler (mine has a high/low setting, and I use the high setting), and crack the oven door.
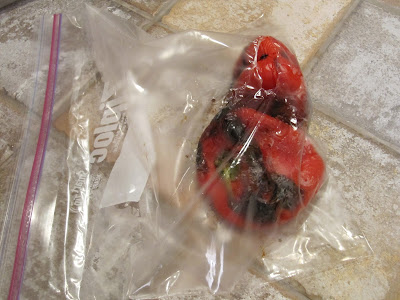
3. Keep a close eye on these babies - the temp is very hot! When the side that is facing up begins to blacken, turn peppers over to blacken the next side. They will start to look like this:

4. Continue turning peppers until all sides are blackened.
5. Remove from heat and immediately place in a bowl covered tightly with plastic wrap. I used a zip top bag this time, and I wouldn't recommend it...those peppers are HOT and can easily melt a hole through the plastic.
6. Once peppers are cool, removed them from bowl and peel the skin (it should come off easily).
7. Remove the top of the pepper, and the seeds.
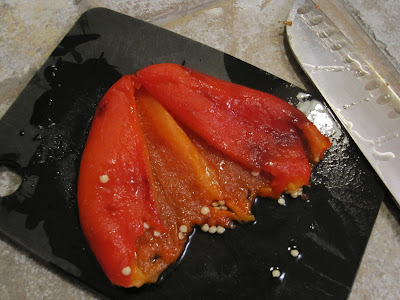
8. Slice/dice and use as desired. If you want to roast peppers in bulk, you can freeze them between sheets of wax paper (these should last for several months), or cover them in olive oil and refrigerate them (should keep for a couple of weeks).
Use the peppers in sauces (recipe coming soon), salads, on sandwiches, or puree and use in dressings or hummus. Yum!
Printable Recipe
Before I realized how easy it was to make them at home, I would buy bottled roasted red peppers at the store.
Now I make my own at home all the time.
Not only is it easy and cheap, but it eliminates the additives and preservatives that you find in the stuff in the jar.
Here is the step by step:
1. Wash peppers and place them on a baking sheet and into the oven.
2. Turn on the broiler (mine has a high/low setting, and I use the high setting), and crack the oven door.
3. Keep a close eye on these babies - the temp is very hot! When the side that is facing up begins to blacken, turn peppers over to blacken the next side. They will start to look like this:

4. Continue turning peppers until all sides are blackened.
5. Remove from heat and immediately place in a bowl covered tightly with plastic wrap. I used a zip top bag this time, and I wouldn't recommend it...those peppers are HOT and can easily melt a hole through the plastic.

6. Once peppers are cool, removed them from bowl and peel the skin (it should come off easily).
7. Remove the top of the pepper, and the seeds.

8. Slice/dice and use as desired. If you want to roast peppers in bulk, you can freeze them between sheets of wax paper (these should last for several months), or cover them in olive oil and refrigerate them (should keep for a couple of weeks).
Use the peppers in sauces (recipe coming soon), salads, on sandwiches, or puree and use in dressings or hummus. Yum!
Printable Recipe
December 2, 2010
Macaroni and Cheese A La Steph! (Kid Friendly!)
It's been a while since I posted a recipe.
Things have been busy and I have been preoccupied, but don't worry!
When I stress, I cook.
When I cook, I eat.
When I eat, I feel better!
I just haven't got around to posting much...
To break the cycle, I am going to tell you about a recipe that I adapted from a recipe that my sweet soul friend Stephanie gave me.
Macaroni and Cheese.
Who doesn't love it?
She gave me this "lightened up" version almost a year ago, and I have to admit...I was a little scared to try it.
One of the main ingredients is...light mayonnaise.
Now don't hate or close your browser window - I know what you are thinking.
Mayo? And not just any mayo, but light mayo?
Trust me, it scared me off for a long time.
But last week, I was craving hearty comfort food (preferably without the love handles), and this came to mind.
So I dug it out.
When I bought the ingredients, I was planning on it just being me for dinner.
But then Steve called and said the kids would like to come by (it's the excuse he uses when he wants to see me but doesn't want to admit it...blames it on the kids...hee hee), and I figured I would use them all as guinea pigs!
That's how I roll.
I was really impressed.
The kids loved it.
Even Andy.
The picky one.
And then I kicked myself for not trusting my Stephanie's judgment sooner.
A lower fat mac and cheese that's kid friendly too?
Brilliant!
Don't get me wrong, this isn't necessarily healthy.
Very few dishes that involve 3 cups of cheese and a pound of pasta are healthy.
But it probably has less calories than most mac and cheese recipes (or at least that is what I am choosing to believe).
I changed a couple of things (surprise!), and I am going to post the recipe that I made...but I will put some tips/variations at the end for you so you can make it your own, ok?
Ok!
 Macaroni and Cheese A La Steph (serves 8)
Cook noodles al dente, drain. Add remaining ingredients and stir and completely combined, adding salt and pepper to taste as necessary.
Transfer to an oven safe casserole dish or pan.
Cook uncovered for 15 - 20 minutes or until heated through.
Enjoy!
* To really make it light, you could use low fat cream of chicken soup and reduced fat cheese. Be careful though, as this might change the texture
* Steph said she usually crushes up whole wheat crackers and sprinkles them on the top...you could also use panko or Italian bread crumbs. I did none of these, because Andy likes things very plain.
* Steph also mentioned that you could add cooked chorizo sausage, bacon, or Italian sausage to this...I have not tried that yet (again, for fear that Andy wouldn't eat it).
* You could also add cooked broccoli, asparagus, spinach, cauliflower, or anything else that would contribute to your illusion of healthiness.
Thank you for the recipe, Steph! I will never doubt you again. xo
Printable Recipe
Things have been busy and I have been preoccupied, but don't worry!
When I stress, I cook.
When I cook, I eat.
When I eat, I feel better!
I just haven't got around to posting much...
To break the cycle, I am going to tell you about a recipe that I adapted from a recipe that my sweet soul friend Stephanie gave me.
Macaroni and Cheese.
Who doesn't love it?
She gave me this "lightened up" version almost a year ago, and I have to admit...I was a little scared to try it.
One of the main ingredients is...light mayonnaise.
Now don't hate or close your browser window - I know what you are thinking.
Mayo? And not just any mayo, but light mayo?
Trust me, it scared me off for a long time.
But last week, I was craving hearty comfort food (preferably without the love handles), and this came to mind.
So I dug it out.
When I bought the ingredients, I was planning on it just being me for dinner.
But then Steve called and said the kids would like to come by (it's the excuse he uses when he wants to see me but doesn't want to admit it...blames it on the kids...hee hee), and I figured I would use them all as guinea pigs!
That's how I roll.
I was really impressed.
The kids loved it.
Even Andy.
The picky one.
And then I kicked myself for not trusting my Stephanie's judgment sooner.
A lower fat mac and cheese that's kid friendly too?
Brilliant!
Don't get me wrong, this isn't necessarily healthy.
Very few dishes that involve 3 cups of cheese and a pound of pasta are healthy.
But it probably has less calories than most mac and cheese recipes (or at least that is what I am choosing to believe).
I changed a couple of things (surprise!), and I am going to post the recipe that I made...but I will put some tips/variations at the end for you so you can make it your own, ok?
Ok!

- 1 lb of your favorite short pasta (I used rotini but you could use elbow macaroni or other)
- 1 can of cream of chicken soup
- 1 cup of light mayo
- 3 cups of grated sharp cheddar cheese
- 1/2 cup of milk to thin
- salt and pepper to taste
Cook noodles al dente, drain. Add remaining ingredients and stir and completely combined, adding salt and pepper to taste as necessary.
Transfer to an oven safe casserole dish or pan.
Cook uncovered for 15 - 20 minutes or until heated through.
Enjoy!
* To really make it light, you could use low fat cream of chicken soup and reduced fat cheese. Be careful though, as this might change the texture
* Steph said she usually crushes up whole wheat crackers and sprinkles them on the top...you could also use panko or Italian bread crumbs. I did none of these, because Andy likes things very plain.
* Steph also mentioned that you could add cooked chorizo sausage, bacon, or Italian sausage to this...I have not tried that yet (again, for fear that Andy wouldn't eat it).
* You could also add cooked broccoli, asparagus, spinach, cauliflower, or anything else that would contribute to your illusion of healthiness.
Thank you for the recipe, Steph! I will never doubt you again. xo
Printable Recipe
December 1, 2010
Kempton's Surgery
Just wanted to update everyone that Kempton's surgery went well! He got sick before and so now he is on meds for that too, but the surgeon said she was pleased with the surgery. He is just starting to wake up now.
I am allowed to go and see him, but the surgeon advised against it...she said that it will most likely make him depressed after I leave, so if I can stand not seeing him for a couple of days that would be best. I want to do what is best for him - and I know that what she is saying is true...I have had friends and family tell me about how Kempton was lethargic, whiny and pouty when I am gone on vacation, etc. So I will try to stay away.
She is going to call tomorrow with an update though.
Thanks for all of your thoughts, prayers, comments, emails, phone calls and text messages - I appreciate it very much!
I am allowed to go and see him, but the surgeon advised against it...she said that it will most likely make him depressed after I leave, so if I can stand not seeing him for a couple of days that would be best. I want to do what is best for him - and I know that what she is saying is true...I have had friends and family tell me about how Kempton was lethargic, whiny and pouty when I am gone on vacation, etc. So I will try to stay away.
She is going to call tomorrow with an update though.
Thanks for all of your thoughts, prayers, comments, emails, phone calls and text messages - I appreciate it very much!
Subscribe to:
Posts (Atom)
